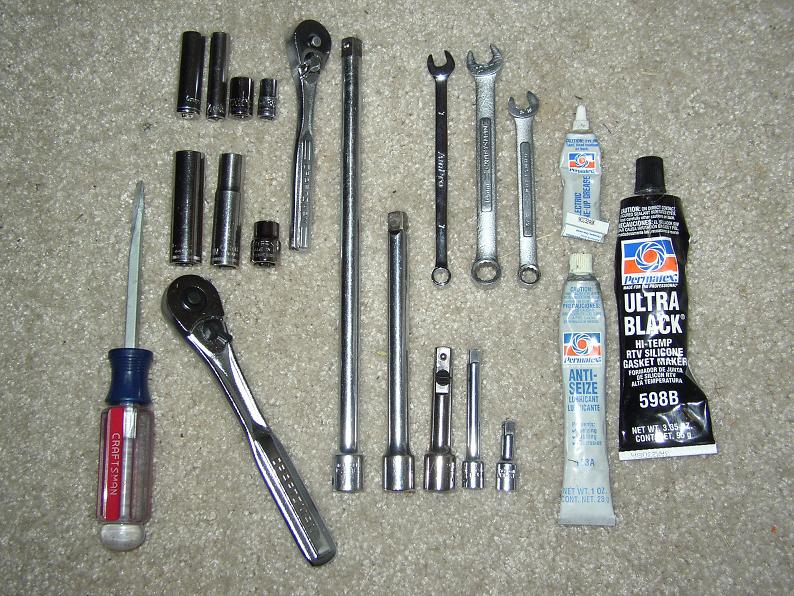
|
Do not make the same mistake
that I made here. I went to FordPartsOnline and purchased a valve cover
gasket for the right and left side. This did NOT include all of the seals
necessary to do the job. You will need 4 seals for the plug wells and
2 more seals for the valve cover bolts that are in the center of the cover.
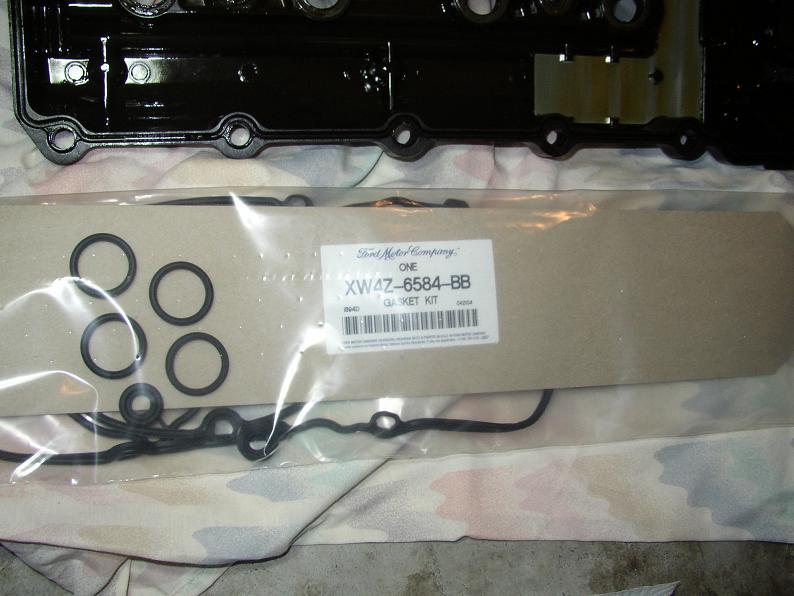
.jpg) Get
the kits: Get
the kits:
- LH - XW4Z-6584-BB Gasket
Kit
- RH - XW4Z-6584-AB Gasket
Kit
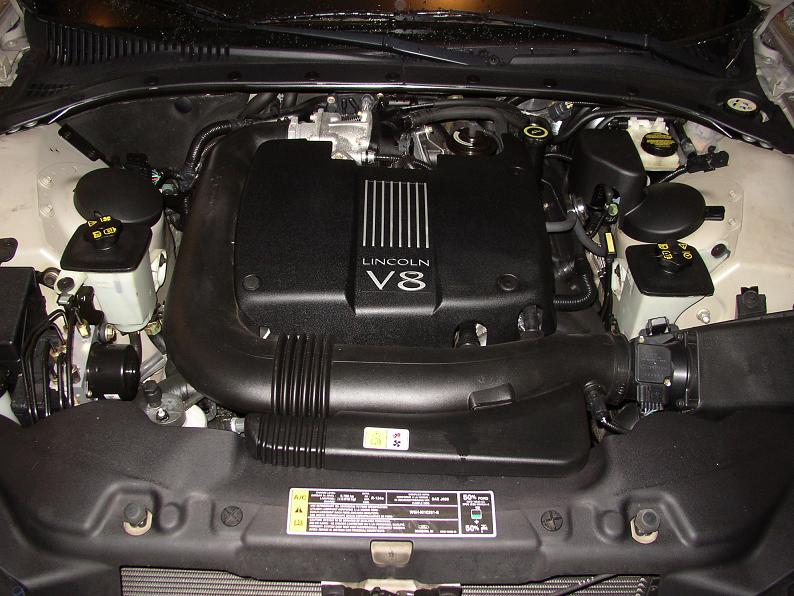
.jpg) This
is pretty much what your engine is supposed to look like once you have
it back together. I would suggest taking pictures as you go along, if
you have a bad memory or haven't worked on cars much. Everything only
goes on one way pretty much, but if you have a digital camera, it doesn't
cost anything and may save you a little time in the end. This
is pretty much what your engine is supposed to look like once you have
it back together. I would suggest taking pictures as you go along, if
you have a bad memory or haven't worked on cars much. Everything only
goes on one way pretty much, but if you have a digital camera, it doesn't
cost anything and may save you a little time in the end.
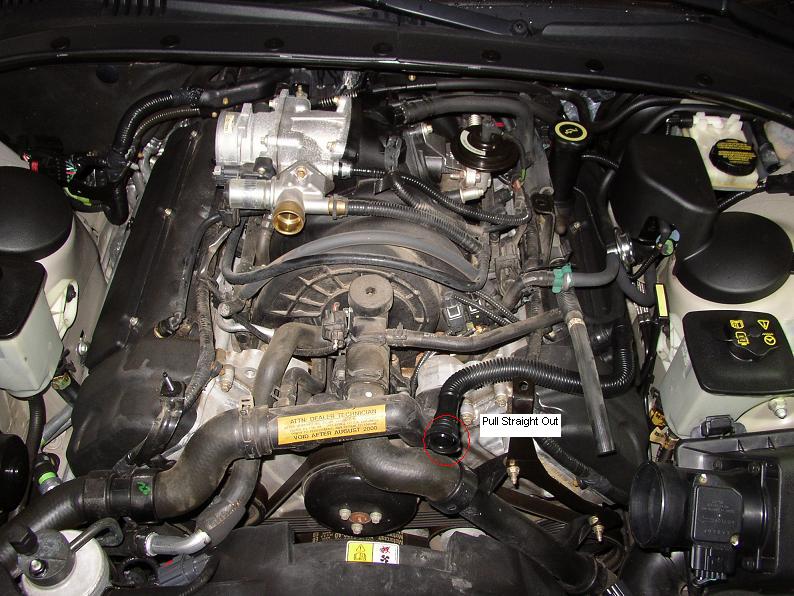
.jpg) First
step is to remove the engine cover. It is just 2 plastic clips and one
rubber fastener. Next remove the air intake assy. Those plastic hoses
come off by pressing in on both sides where the plastic is grooved for
grip. Pull STRAIGHT out and they should come out. One of mine was pretty
tough, but just be sure not to force it out as you might crack it. Once
this is done you can actually see the engine! First
step is to remove the engine cover. It is just 2 plastic clips and one
rubber fastener. Next remove the air intake assy. Those plastic hoses
come off by pressing in on both sides where the plastic is grooved for
grip. Pull STRAIGHT out and they should come out. One of mine was pretty
tough, but just be sure not to force it out as you might crack it. Once
this is done you can actually see the engine!
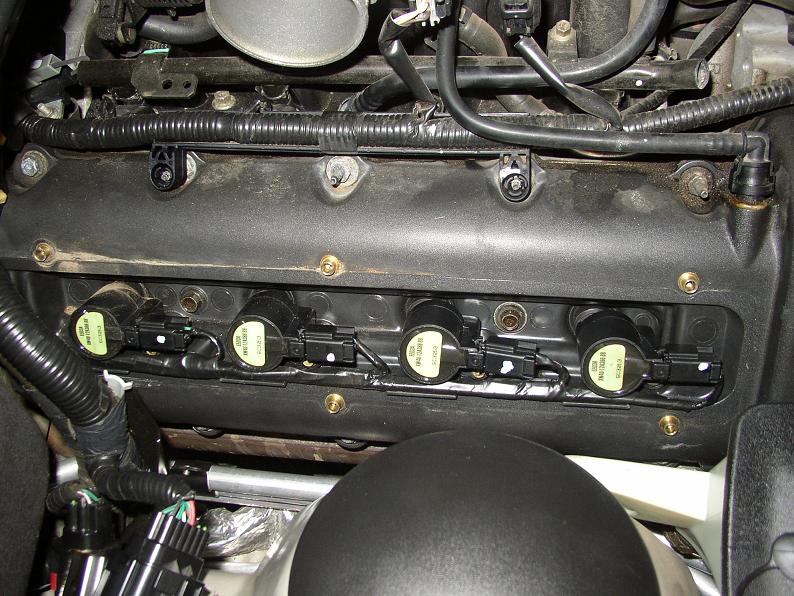
.jpg) The
coil packs are hidden behind covers in the center of the valve cover.
A 1/4" drive with a tiny extension and 7 mm socket gets all of the RH
ones out. The LH side is more tricky. The bolt closest to the brake booster
can be removed using a 7 mm wrench. You will have to remove the bolts
holding the fan fluid resevoir in place to move it out of the way, as
well as 2 bolts holding a harness in place near the rear for the RH side.
For the LH you will need to remove the bolts for the power steering resevoir
and the EVP unit which is two bolts on the strut tower. The
coil packs are hidden behind covers in the center of the valve cover.
A 1/4" drive with a tiny extension and 7 mm socket gets all of the RH
ones out. The LH side is more tricky. The bolt closest to the brake booster
can be removed using a 7 mm wrench. You will have to remove the bolts
holding the fan fluid resevoir in place to move it out of the way, as
well as 2 bolts holding a harness in place near the rear for the RH side.
For the LH you will need to remove the bolts for the power steering resevoir
and the EVP unit which is two bolts on the strut tower.
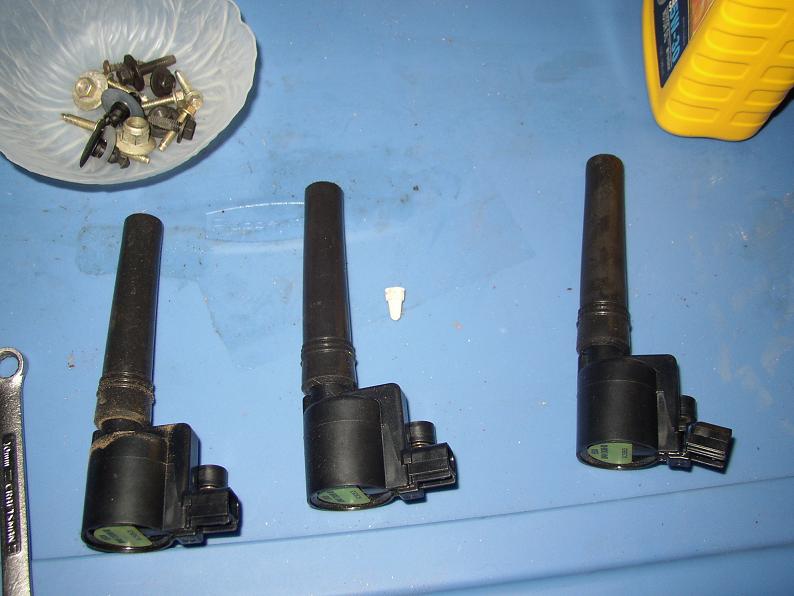
.jpg) Be
careful when removing the electrical connector on the coils. Pull straight
back after pushing on the release tab. You can see someone pulled up on
the last coil in this picture. I was able to "force" it back in place.
I thought it would crack, but it survived and clicked back. I had one
bad coil and replaced it with an Advanced Auto part, but it had a Ford
part number with a newer rev letter. FordPartsOnline has them also. You
can remove the boots and clean them as well as the spring. I suggest using
dielectric grease on both ends of the rubber as well as the electrical
connectors. Be
careful when removing the electrical connector on the coils. Pull straight
back after pushing on the release tab. You can see someone pulled up on
the last coil in this picture. I was able to "force" it back in place.
I thought it would crack, but it survived and clicked back. I had one
bad coil and replaced it with an Advanced Auto part, but it had a Ford
part number with a newer rev letter. FordPartsOnline has them also. You
can remove the boots and clean them as well as the spring. I suggest using
dielectric grease on both ends of the rubber as well as the electrical
connectors.
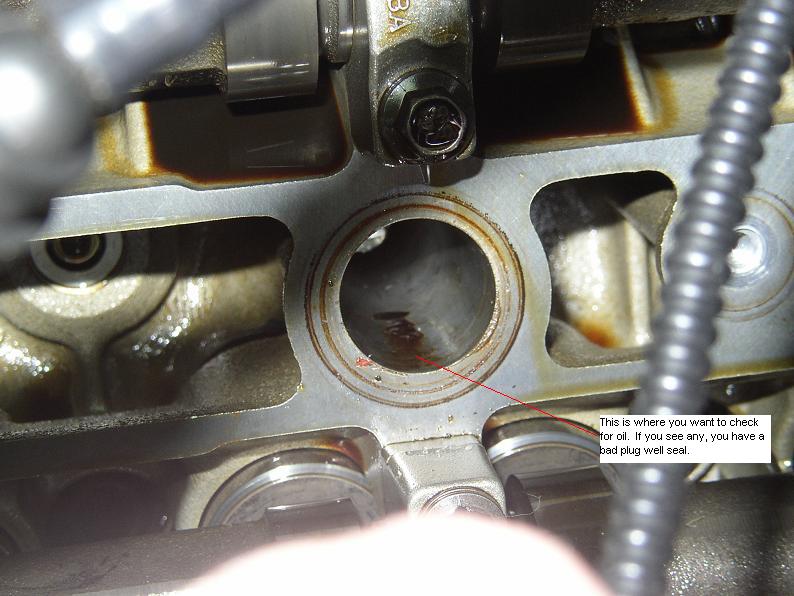
.jpg) Look
down the well and check for oil. If you find ANY down there, you need
to do the gasket replacement. The theory is that the oil helps to short
out the high voltage end of the coil causing it to go bad. It seems that
they go bad without oil as well though. If your coils come out too easily,
your boots need replacing. It should try to "stick" to the plug. I used
a little brake cleaner and a paper towel to clean the well. Look
down the well and check for oil. If you find ANY down there, you need
to do the gasket replacement. The theory is that the oil helps to short
out the high voltage end of the coil causing it to go bad. It seems that
they go bad without oil as well though. If your coils come out too easily,
your boots need replacing. It should try to "stick" to the plug. I used
a little brake cleaner and a paper towel to clean the well.
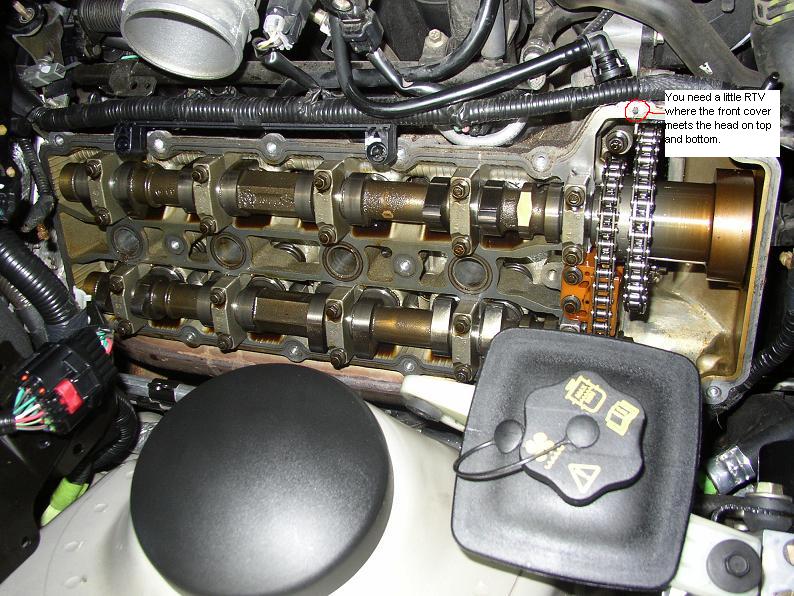
.jpg) I
say start with the RH side first to build confidence. The biggest pain
for me was making sure all the wiring harness fasteners were removed from
the valve cover. Once that is done, just lift up gently and slowly pull
back and to the front of the vehicle. Do not force anything as these are
plastic covers and cost about $120 each. I used a scotch bright pad and
lightly went over all gasket mating surfaces to clean it up. I then used
brake cleaner. The ONLY place to use sealant is between the front cover
and head along the seams on the top and bottom. I
say start with the RH side first to build confidence. The biggest pain
for me was making sure all the wiring harness fasteners were removed from
the valve cover. Once that is done, just lift up gently and slowly pull
back and to the front of the vehicle. Do not force anything as these are
plastic covers and cost about $120 each. I used a scotch bright pad and
lightly went over all gasket mating surfaces to clean it up. I then used
brake cleaner. The ONLY place to use sealant is between the front cover
and head along the seams on the top and bottom.
.jpg) You
can see here that the old seals were gray. Your new seals should be black
and have been revised for more reliability. I used brake cleaner to dry
all the surfaces of oil and installed the new seals. The bolts are an
interesting design as they hold the gasket in place for installation.
Just press on the new seal through the bolts and washer/spacer assy. Be
sure your bolts have been cleaned also. I say start with the RH side first
to build confidence. The biggest pain for me was making sure all the wiring
harness fasteners were removed from the valve cover. You
can see here that the old seals were gray. Your new seals should be black
and have been revised for more reliability. I used brake cleaner to dry
all the surfaces of oil and installed the new seals. The bolts are an
interesting design as they hold the gasket in place for installation.
Just press on the new seal through the bolts and washer/spacer assy. Be
sure your bolts have been cleaned also. I say start with the RH side first
to build confidence. The biggest pain for me was making sure all the wiring
harness fasteners were removed from the valve cover.
.jpg) You
also need to remove the air cleaner assy for the LH job. That dipstick
nut can be tough if you don't have a short enough deep-well socket also.
The dipstick can then be lifted enough to move out of the way. You may
also need to remove the bolt on the strut tower that holds the fuel line
to access the VC bolt there. These lower bolts are a tight fit. I used
a 1/4" drive for all of these and had a heck of a time, but was able to
get to them. You
also need to remove the air cleaner assy for the LH job. That dipstick
nut can be tough if you don't have a short enough deep-well socket also.
The dipstick can then be lifted enough to move out of the way. You may
also need to remove the bolt on the strut tower that holds the fuel line
to access the VC bolt there. These lower bolts are a tight fit. I used
a 1/4" drive for all of these and had a heck of a time, but was able to
get to them.
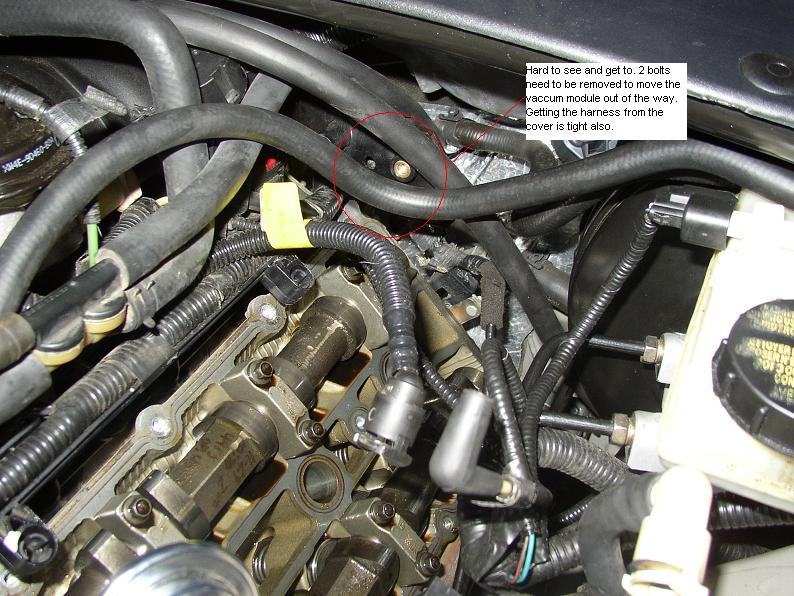
.jpg) There
are two bolts holding a vaccum module at the back of the head also. You
must remove them and move the unit aside. There is another plastic piece
that looks like it will be in the way still, but you will be able to clear
it. I totally removed the EVP to make room also. There is a metal bracket
along the top of the valve cover that must be removed as well. There
are two bolts holding a vaccum module at the back of the head also. You
must remove them and move the unit aside. There is another plastic piece
that looks like it will be in the way still, but you will be able to clear
it. I totally removed the EVP to make room also. There is a metal bracket
along the top of the valve cover that must be removed as well.
.jpg) The
fuel line must be disconnected for clearance. Find the schrader valve
and release pressure from there first. I used my fuel pressure gauge as
it has a release button. Get a set of those plastic fuel line release
tools, if you don't have them. They work great. Push it in place and pull
the fuel line straight out using a rag to catch any run-off. The line
will twist out of your way now. If you are in a garage with a gas furnace,
be careful here! The
fuel line must be disconnected for clearance. Find the schrader valve
and release pressure from there first. I used my fuel pressure gauge as
it has a release button. Get a set of those plastic fuel line release
tools, if you don't have them. They work great. Push it in place and pull
the fuel line straight out using a rag to catch any run-off. The line
will twist out of your way now. If you are in a garage with a gas furnace,
be careful here!
Be sure to torque the bolts
from the center out. Torque specs for the valve covers are 89 in lbs.
Once you have it all back together and start the engine, be sure to check
for fuel leaks or other oddities. You can bet that you will be burning
some oil off the exhaust for a few hours also. My LH side took a couple
of hours of driving to totally clear up. I would also suggest driving
the car for a week or so and then pull the coils back out to make sure
everything is dry. If it is, you should be good to go!
|