Sorry for the necro thread revival.
I want to provide better information on how to find the low side charge port, on at least the 03-06 models. I have no idea if this is different on 00-02 models.
I just finished recharging my A/C on my 2006 LS Ultimate (owned since new). I used RedTek products: one can of LeakSeal, one OilCharge, two 6 oz cans of refrigerant. (Note the LeakSeal and OilCharge each have 2 oz of refrigerant in them). I now get about 8 degrees Celcius from the vent at full fan on a hot day. Amazing.
There is NO NEED to remove the fender skirt.
1. Crank the wheels fully left.
2. optionally lift and secure the car (driver side). This makes it much easier to get in there, but if you don't have safe lifting equipment you can still
just manage.
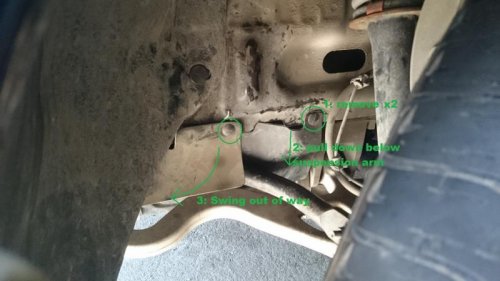
3. Refer to first photo below. Remove (pull out) the two circled plastic retainer clips. pull the large cover down below the suspension arm. Swing the small rubber cover (it will swivel on the remaining clip that you didn't remove).
4. Locate the charge port. It is just behind the exposed area, at about the level of the opening, and between the two removed clips. Refer to photo 2.
5. Remove the dust cap. Inspect for signs of oil which would indicate leaking through the port.
To use the RedTek products you could try to follow their horrible directions, or this:
1. fully unscrew the winged screw (the valve) on the can end of the hose. This retracts the needle that will pierce the can.
2. screw the can onto the hose and tighten well by hand.
3. screw the winged screw back down to pierce the can. DO NOT UNSCREW IT YET, you will release the product if you do.
4. Attach the coupler to the charge port. It works like all such quick connects: Pull back the collar while pressing it into place, then ensure the collar goes back to the normal position to lock it into place. wiggle and tug it a bit to make sure it is on there well. If you have even a little tiny bit of left refrigerant in the sytem, and the compressor is not running (it isn't) then you should see a pressure of ~60-90 PSI. If you have pressure, skip to step 6. 5. No/Low pressure? The compressor may not kick in, which is necessary to finish the process, so do step 5.
5. Invert the can (so it dispenses liquid, not gas) and open the valve (i.e. fully unscrew the winged screw - don't loosen the can from the hose!). After a few minutes, the system will have received a minimal charge which will allow the compressor to run, so close the valve.
6. Start the car, crank the A/C, and monitor the pressure on the low side. It will go down (from 60-90 down to below 40 PSI) if the compressor kicks in.
7. If all is well, invert the can and open the valve on the filler hose again to dispense the rest of the product. Keep can inverted all the while. The pressure will go up while this is happening.
8. When the pressure drops again (but likely not down into the green), you have dispensed all the product. This takes 5-10 minutes.
9. Close the valve. Shut off car. Remove quick coupler from A/C filler port.
10. Open the valve to vent the small amount of pressure from the can. It should psssss for a couple seconds at most. Remove and recycle the can.
11. repeat if necessary for other products.
12. Enjoy

Note: The following photo is UPSIDE DOWN. Sorry.


