Rear lower control arm bushing replacement (pics)

About $90.....

Ahhh okay. Damn the US dollar is really dropping!

I wonder if these are any better quality than the Deutche parts set.

Guess I should just wait until I have enough to buy the full assemblies. But it sure would be nice to spend almost 500 dollars less. :)
 
This is all great works. I have a 2004 Lincoln LS v8. I was having some serious noise from the front end and the back end is not much better. Looking at the bushings everything seems to be very worn from over the years. Is this a easy job to replace the bushings, tie rods outer/inner etc on the back and front. What kind of tools are needed? IS there a diagram of the suspension available?
 
Getting ready to do this and I have a few quick questions:

1. Has it been verified whether the Racing Green bushing and the Deutsche Parts bushing is the same part?

2. Has anyone actually installed either of these parts who can give some feedback about the installation and performance?

3. My understanding is that the blue spacer caps in the OP were necessary because her used a universal bushing that wasn't as wide as the stock ones, and that such caps wouldn't be necessary if using one of these OEM-style bushings. Is this correct?

4. If I bring these bushings and my control arms to a shop, will it be a simple press-out/press-in for them and their equipment, or will they need to "fashion" something like the OP did?

5. Sorry if this is dense, but aren't there three bushings per control arm? I'd need three pairs of bushings to do both control arms, right?

Thanks!
 
Last edited:
I got 2 sets of the Racing Green bushings, removed the rear lower control arms, and took the LCAs and the bushings to the shop I normally use for everything. They said they couldn't safely press in the new bushings and that I should try a machine shop (which are not open on weekends). So I am considering trying to do it myself.

I think the issue is that to do this without damaging the new bushing, you're supposed to press on the outer sleeve rather than trying to press/pull it through by the center core. I will need to find a commercially available solution as I don't have access to a machine shop. I'm thinking maybe just get two sockets, one that will fit over the bushing's center core and rubber boot and mate against the outer sleeve while being slightly smaller in diameter than the overall bushing, and one that the entire bushing will fit into that will mate against the LCA.

Anyone have a better idea or suggestion?
 
I think the shop didn't want to press the bushings because of the aluminum control arm. One "ooops" on their part and they would be buying you a whole control arm at their expense. Many shops will shy away from replacing bushings in aluminum suspension parts... due to liability.

A little heat helps expand the aluminum so that the bushings will press in and out easier. Usually a couple minutes with a propane torch is enough. I suggest you go back to the beginning of this thread,,, and see how the OP removed and installed the bushings. IIRC,,, he pretty much gave step by step instructions.

Just out of curiosity... did the boxes from Racing Green say what country the new bushings were made in??? If from England... most likely they are Lemforder,,, and factory Jag bushings. If India, Pakistan, or other Middle East country... most likely Mevotech. If china... who knows.
 
I studied the OP very carefully. The technique he used won't work on the Racing Green bushings because the RG bushings protrude from the ends of the outer sleeves, whereas the bushings the OP used were flush on the edges. The OP's bushings could be pressed in with just a flat washer. Can't do that with the RG bushings.
 
The puller the OP came up with, (in pic #1 and pic #2), would work for pulling your old bushing. For install,,, you would put the sleeve on the side opposite the side the new busing is being drawn in from. The only thing you would need at that point, (for install)... is a second slightly smaller sleeve,,, that would catch ONLY the outer part of the new bushing... and a longer bolt, (long enought to capture 2 sleeves and the bushing). The second slightly smaller sleeve only needs to be long enough to keep from putting pressure on the core, (as you put it).

The flat plate would then push against the smaller sleeve, which is only pushing against the outer part of the bushing,,, and the larger sleeve, (on opposite side), would allow the new bushing to be drawn through... into the control arm without the inner part of the bushing making contact with the puller/installation tool.

This is most likely why the shop told you to take the control arm to a machine shop... because if you don't have access to parts to make the puller/installation tool,,, the macnine shop could make them. Print the pics in the first post and tell the machine shop what you are wanting to do. The will either make the parts for you, (for a nominal fee), or actually install the bushings for you.

One thing to keep in mind... IIRC,,, the bushing isn't centered in the control arm. It may be offset to one side or the other. If the new bushing isn't positioned correctly, it will cause premature wear to the new bushing... and other parts in the control arm. At minimum you will need a set of dial calipers to measure this.
 
Yes, getting the old bushings out is easy. It's finding the right size installer tube that is the problem. That and keeping everything aligned so the bushing goes in straight. I'm considering buying a shop press, freezing the bushings, and using a heat gun on the control arm to make things a little easier. But without the right installer tube it's pointless.

I've got a friend with a 12-point 1-5/16" socket I'm going to try, but I'm not optimistic.
 
Well the installer tube could be made by the machine shop to proper dimensions. I'm thinking the OP had his own personal resources for that. Alignment starts by eye,,, and all parts being square. Once the bushing finds the contol arm bore,,, evrything should slide right in... it all depends on everyting being square, (why do I feel like I'm giving a sex ed course).

Freezing the bushings and heating the control arm is a good idea. I've done this with pinion bearings, (heat), and pinion gears, (freezer), with out a press. Same for differential carrier bearings. Personally,,, I think you'll need more heat than a heat gun,,,, that's why I suggested a propane torch. I don't suggetst trying to do this on a bench. Do it with the control arm on vehicle,,, like the OP did. Monitor temp of control arm with IR temp gun. Min temp at least 200 degrees. No more than 400.

You have the right idea,,, but your application needs adjustment. A long(er) high strength bolt like the OP shows in his pics,,, would be best. High strength fine thread,,, or ACME all-thread and nuts, (like a jaw puller uses), would be best. Stay away from 12 point bolt and sockets unless you have to use them. Unless hardened,,, the heads of 12 point bolts round off,,, and 12 point sockets are more prone to same.

12:40 AM here. have to get up for work at 5. Think this through,,, and don't try to cut corners to save money. It WILL bite you in the ass.
 
Thanks for the suggestions. I had been using a C-clamp-style ball joint press rather than a bolt and screw to pull it through. The reference to the 12-point socket was as something to use as an installer tube. I think the socket might fit over the rubber boot and be strong enough to take the force.

Plus, I don't think it's possible to do the inner bushing with the control arm on the car.


But in the end, I chickened out. The Lemforder control arms were on sale so I bought them.

If anyone is interested, I'll sell the two sets of RG bushings for a discount, and Priority Mail shipping anywhere in the US.
 
Does the 3rd bushing not need replaced?

I can speak to that. The third bushing is a simple rubber bushing and not one of these ball-joint-style bushings, and it will not need replacing nearly as often as these other two bushings will. I just replaced my entire suspension, and virtually everything was shot to hell. Boots long gone, ball joints floppy and loose, bushings completely separated . . . but this third rubber bushing in the rear lower control arm was perfect on both sides.
 
One of these days when things life slows down,,, and I find the ambition at the same time... I'm gonna pull one of the LCAs,,, put in my drill press... and try drilling through to the inner part of the factory bushing and add a grease fitting.

Theo,

I got what you said about the intended use of the 12 point socket. It was getting late and I wasn't translating properly. Again though out of curiosity,,, did the RG bushings say where they were made anywhere on the packaging???
 
Last edited:
I purchased a set of the bushing described above from E-bay. Not a single ID mark on them.
A while ago, I pressed apart a stock outer bushing that I replaced last year. I am attaching images for those who want to see what the insides look like.
Note that the new bushing has a narrower outer body than the stock one, but the rubber seals look to be a better design than the original ones.
I wonder how much of a difference a narrower bushing will make pressed into the control arm.

20150703_225927.jpg


20150703_225842.jpg


20150703_225750.jpg
 
I purchased a set of the bushing described above from E-bay. Not a single ID mark on them.
A while ago, I pressed apart a stock outer bushing that I replaced last year. I am attaching images for those who want to see what the insides look like.
Note that the new bushing has a narrower outer body than the stock one, but the rubber seals look to be a better design than the original ones.
I wonder how much of a difference a narrower bushing will make pressed into the control arm.

Did those rear bushings from ebay fit? I'm thinking of tackling my rear suspension soon and was wondering how this all worked out for you.
 
I have not installed them. I purchased them to have spares for when the time comes and I need to replace them. I did try to install some custom bushings a while back, but that hasn't worked out yet.
I pressed out the bushings and that is why have have original ones to look at.
 
well... they are drillable and and greaseable

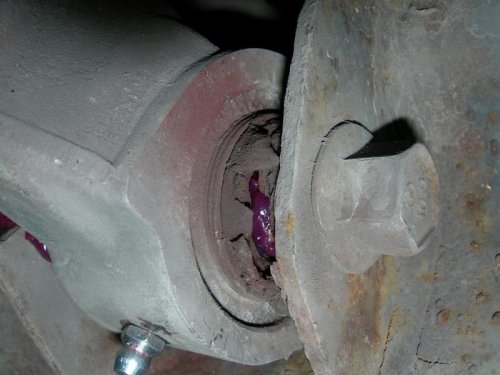
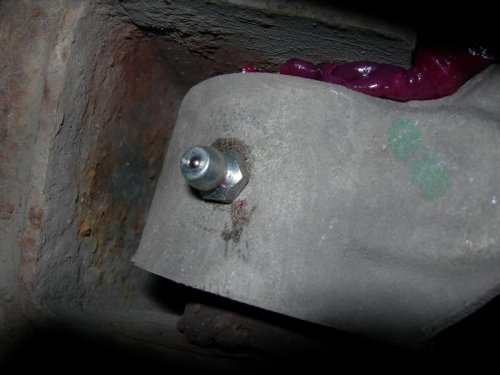
Thanks to tijoe's pics... I knew exactly what I was going to be drilling into. I didn't end up pulling the control arms, but instead did the work under the car this weekend. I center punched a mark on the rear bushing on both control arms,,, drilled a pilot hole with a 3/64 bit,,, then went to a #3 bit... and finally tapped the hole with a 1/4-28 tap. Lock-Tited some grease fittings into place... and voila.

Having problems getting pics to upload,,, so maybe in a different post.

The aluminum of the control arm drills pretty easy. The steel of the bushin takes a little more effort. You will know you are in the plastic when you feel a slight "thunk" as the bit sinks in quickly.
 
If someone could find a source for the torn boots,,, it would be pretty easy to drop the control arms and swap the boots. Then drill and grease. Maybe I'll have the time to do the homework this winter... but if someone else wants to try in the mean time,,, jump on it.
 
Completed this job just as 04 Sport LS described on an 2005 LS. I started drilling with a cheap set of drill bits I received for Christmas and snapped a couple then resorted to my older less sharp "good set" of bits which did the job, moral of the story is use a good set of bits. Used 3/16" bit, 6mm tap and 6mm grease fitting. Done!!
 
Drill bit sharpeners don't cost much, they're a lot cheaper using them on quality bits than replacing cheap ones over and over.
 
FYI and fair warning. I got about a year and roughly 20,000 highway miles out of this temporary fix. During my last LOF,,, I hit the zerks on the rear contol arms... and saw the left rear move. That means the bushing is toast. Now I'm trying to see what the difference is between the gen1 and gen2 rear control arms are. Aftermarket gen1 arms seem plentiful,,, where there is no aftermarket for gen 2 arms.
 

Members online

No members online now.
Back
Top