racecougar
Well-Known LVC Member
I was approached to write up a tech article for SCCOA on the current bushing offerings for both the front and rear suspension systems. I thought I might post this here as well.

Whether you prefer a smooth, stock ride, or something a bit firmer and performance oriented, after twenty-plus years of service, all of these cars deserve a thorough inspection and possibly replacement of the various bushings throughout the front and rear suspension systems. Let’s dive right in and see what we’re dealing with, and what our replacement options are.
In the photo below, a 1-1/4” Energy Suspension bushing/mount is on the left. On the right is what you would receive with a 1-1/4” ADDCO anti-sway bar. If you look closely, you’ll notice that it is a 1-1/16” bushing that has been bored out to fit the 1-1/4” bar, leaving behind a rough, grippy surface without any channels for grease retention. These bushings, as well as the factory original rubber bushings, tend to squeak and resist movement. Gratuitous use of grease during assembly only delays the onset of this annoyance.

Notice the chart below, found at the following link: http://www.energysuspensionparts.com/Universal-Sway-Bar-Bushings.asp
For the front anti-sway bar, you want to stick to the bushings in the right column of the chart. For example, with a 1-1/4” ADDCO bar, you would order part number 9.5172. If you are using a stock bar, measure the diameter of the bar with a set of calipers at the bushing location and check the chart to see if a bushing is available in the appropriate size.

Just one of many reported cases of this issue: http://forums.tccoa.com/showthread.php?t=44814

I highly recommend sticking to the Motorcraft rubber bushings in this instance. You’ll need two of each of the following:
Strut rod to K Member bushings: E9SZ-3B271-A and F7SZ-3A225-AA
Strut Rod to Lower Control Arm Bushings: E9SZ3A140A and E9SZ3A140B
This wonderful set of photos with part numbers was posted by Marcus at Lincolnvscadillac.com:
http://www.lincolnvscadillac.com/fo...-LCA-s&p=2037284674&viewfull=1#post2037284674


When running a larger ADDCO rear anti-sway bar, broken mounts become a common problem. One solution that has worked for me in the past was to increase the thickness of the mount saddle near the bolt hole. Note the additional thickness of the mount saddle on the right side of the photo below.

An improved solution is accomplished through the use of one of Energy Suspension polyurethane bushing sets along with an easily fabricated mount plate arrangement. For the rear anti-sway bar bushings, you will want to order from the left column in the chart I posted earlier. For example, with a 1-1/4” ADDCO bar, you would order part number 9.5165. Just as before, if you are using a stock bar, measure the diameter of the bar with a set of calipers at the bushing location and check the chart to see if a bushing is available in the appropriate size.
To use the Energy Suspension bushings, you will need to create both a backing plate and a threaded plate (a nut tacked to flat stock will suffice) for each side. The backing plate will sandwich between the bushing and the IRS cradle, while the threaded plate will provide a location for the rear mounting bolt to attach to.


This is the bushing you DON'T want to install:

Those consist of a metal core with a off-center, elliptical, hole inside a metal sleeve which is rubber bonded to an outer shell. Turning the inner core via the bolt allows for camber adjustment, however with the sleeve bonded to the outer shell, the control arm can't move without winding up the bushing. Whoever designed/manufactured the bushing either didn't grasp or simply disregarded the original, correct design; something that seems to happen all too often when it comes to aftermarket parts. Installing these bushings results in a relatively harsh ride and very limited rear suspension travel.
This is the bushing you DO want to install (original design):

Those allow camber adjustment and full range of motion without windup, just as they should.
I recommend replacing these bushings with a harder material, such as the greaseable, Delrin bushings with hard anodized aluminum sleeves offered through a few individuals. Polyurethane will offer an improvement over the stock rubber bushings, however the harder Delrin material is better suited for this location.
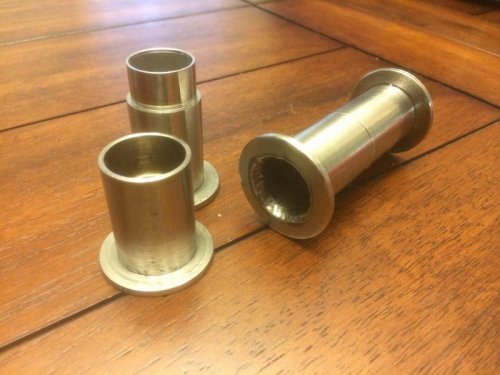
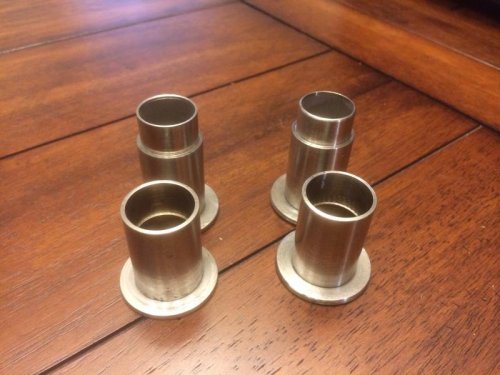
This is the lower control arm bushing kit that Doug (RIP) offered:


Photos borrowed from his website: http://home.comcast.net/~dlfraleigh/Delrin/TBirdLCADelrinBushingKit.pdf
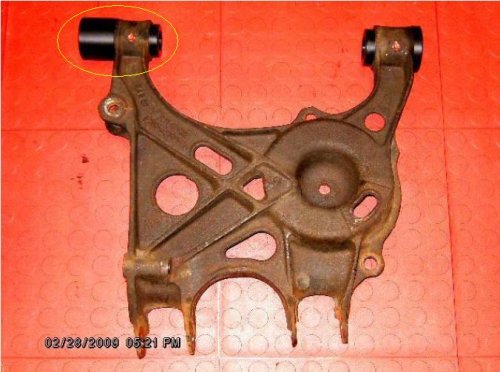
This is the knuckle bushing kit Doug (RIP) offered:


Photos borrowed from his website:
http://home.comcast.net/~dlfraleigh/Delrin/KnuckleDelrinBushingKit.pdf
When it comes to the rear mount, which attaches to both the IRS cradle and the differential cover, there are a few different paths. One common, and cost-effective, method is to simply place a bolt through the rear mount, preventing the inner and outer halves from moving in relation to one another.

Another relatively new option is to run a polyurethane bushing in a alternative mount design, such as the one offered by Performance Art Works. If you’re handy with a welder, you can make your own at home without much difficulty using a polyurethane 4-link end and some flat stock.


Pictures from SCP: https://supercoupeperformance.com/partBrowser.aspx?partId=833
Regardless of what method you choose to employ, I highly recommend either reinforcing the differential cover with a diff cover brace or replacing the cover with a sturdier version. LPW, FRPP, Fore Innovations, and Control Freak all offer heavy duty differential covers, and far, far more suppliers of differential cover braces exist.
The LPW cover:

Without bracing or replacing the stock differential cover, you run the risk of snapping the mount right off.

I hope that this short intro to MN12/FN10 suspension bushings proves helpful to you when choosing the proper replacement parts for your vehicle.
Recommended suspension bushings for MN12’s and FN10’s
Written by: Rod Maksimovich (Racecougar)
Written by: Rod Maksimovich (Racecougar)
Whether you prefer a smooth, stock ride, or something a bit firmer and performance oriented, after twenty-plus years of service, all of these cars deserve a thorough inspection and possibly replacement of the various bushings throughout the front and rear suspension systems. Let’s dive right in and see what we’re dealing with, and what our replacement options are.
Front anti-sway bar mount bushings:
Whether we’re dealing with a stock anti-sway bar or one of the offerings from ADDCO, Energy Suspension has you covered here. They offer a channeled, greaseable, polyurethane bushing, along with mount saddles and grease zerks that is leaps and bounds superior to both the stock rubber bushings and the “hogged out” poly bushings supplied with the ADDCO bars. In the photo below, a 1-1/4” Energy Suspension bushing/mount is on the left. On the right is what you would receive with a 1-1/4” ADDCO anti-sway bar. If you look closely, you’ll notice that it is a 1-1/16” bushing that has been bored out to fit the 1-1/4” bar, leaving behind a rough, grippy surface without any channels for grease retention. These bushings, as well as the factory original rubber bushings, tend to squeak and resist movement. Gratuitous use of grease during assembly only delays the onset of this annoyance.
Notice the chart below, found at the following link: http://www.energysuspensionparts.com/Universal-Sway-Bar-Bushings.asp
For the front anti-sway bar, you want to stick to the bushings in the right column of the chart. For example, with a 1-1/4” ADDCO bar, you would order part number 9.5172. If you are using a stock bar, measure the diameter of the bar with a set of calipers at the bushing location and check the chart to see if a bushing is available in the appropriate size.
Front strut rod bushings:
This is one area where a higher durometer bushing material isn’t only undesirable, it can become downright dangerous. The thermoplastic strut rod to K-member bushings are known to fail without warning, which can have serious consequences. Just one of many reported cases of this issue: http://forums.tccoa.com/showthread.php?t=44814
I highly recommend sticking to the Motorcraft rubber bushings in this instance. You’ll need two of each of the following:
Strut rod to K Member bushings: E9SZ-3B271-A and F7SZ-3A225-AA
Strut Rod to Lower Control Arm Bushings: E9SZ3A140A and E9SZ3A140B
This wonderful set of photos with part numbers was posted by Marcus at Lincolnvscadillac.com:
http://www.lincolnvscadillac.com/fo...-LCA-s&p=2037284674&viewfull=1#post2037284674
Front upper control arm to shock tower bushings:
While there are polyurethane replacements available, this is an area of diminishing return. Provided that they are in satisfactory condition, the typical rubber bushings as provided in any replacement upper control arm assembly will perform sufficiently. If this is an all-out autocross or open track effort, I could understand switching over to poly.Front lower control arm to K-member bushings:
Same as above.Rear anti-sway bar mount bushings:
Just as the front anti-sway bar mount bushings, there is significant room for improvement here. These bushings host all the same issues, along with an additional recurring problem when a larger rear anti-sway bar is added to the mix. When running a larger ADDCO rear anti-sway bar, broken mounts become a common problem. One solution that has worked for me in the past was to increase the thickness of the mount saddle near the bolt hole. Note the additional thickness of the mount saddle on the right side of the photo below.
An improved solution is accomplished through the use of one of Energy Suspension polyurethane bushing sets along with an easily fabricated mount plate arrangement. For the rear anti-sway bar bushings, you will want to order from the left column in the chart I posted earlier. For example, with a 1-1/4” ADDCO bar, you would order part number 9.5165. Just as before, if you are using a stock bar, measure the diameter of the bar with a set of calipers at the bushing location and check the chart to see if a bushing is available in the appropriate size.
To use the Energy Suspension bushings, you will need to create both a backing plate and a threaded plate (a nut tacked to flat stock will suffice) for each side. The backing plate will sandwich between the bushing and the IRS cradle, while the threaded plate will provide a location for the rear mounting bolt to attach to.
Rear upper control arm to IRS cradle bushings:
This bushing has a keyed, eccentric core. Rotating the core by turning the bolt securing it to the IRS cradle provides rear camber adjustment. However, this bushing is very commonly skipped over by the unknowledgeable alignment tech at the typical tire chain store. This bushing is notorious in a few other ways as well. As it wears, it allows the top of the rear tire to move inward/outward, affecting the rear camber. It often results in a “loose” feeling similar to a failing rear wheel bearing. It has also has caused some trouble due to a well-circulated replacement bushing of a flawed design. Both the correct, original design and the flawed replacement have shown up in the same packaging, under the same part numbers, through multiple brands. The only way to be certain you're receiving the correct part is to open the box(es) prior to payment and verifying visually.This is the bushing you DON'T want to install:
Those consist of a metal core with a off-center, elliptical, hole inside a metal sleeve which is rubber bonded to an outer shell. Turning the inner core via the bolt allows for camber adjustment, however with the sleeve bonded to the outer shell, the control arm can't move without winding up the bushing. Whoever designed/manufactured the bushing either didn't grasp or simply disregarded the original, correct design; something that seems to happen all too often when it comes to aftermarket parts. Installing these bushings results in a relatively harsh ride and very limited rear suspension travel.
This is the bushing you DO want to install (original design):
Those allow camber adjustment and full range of motion without windup, just as they should.
Rear lower control arm to IRS cradle bushings:
This is one area where we can significantly reduce the vehicle’s tendency to wheelhop by changing the bushing material. Under heavy acceleration, the stock rubber bushings, along with toe link compensators that are typically past their prime, allow the control arm to deflect forward, at which point the tire breaks traction, the bushings rebound, and the cycle repeats rapidly. Removing this “give” will prevent this movement, which is a step in the right direction when it comes to reducing wheelhop and undesired rear toe changes.I recommend replacing these bushings with a harder material, such as the greaseable, Delrin bushings with hard anodized aluminum sleeves offered through a few individuals. Polyurethane will offer an improvement over the stock rubber bushings, however the harder Delrin material is better suited for this location.
This is the lower control arm bushing kit that Doug (RIP) offered:
Photos borrowed from his website: http://home.comcast.net/~dlfraleigh/Delrin/TBirdLCADelrinBushingKit.pdf
Rear knuckle to upper and lower control arm bushings:
Just as the lower control arm to IRS cradle bushings, replacing the stock rubber knuckle bushings with a harder material can be advantageous. Once again, Delrin is better suited to the task than polyurethane, and a few individuals also produce a nice greaseable set with hard anodized aluminum sleeves.This is the knuckle bushing kit Doug (RIP) offered:
Photos borrowed from his website:
http://home.comcast.net/~dlfraleigh/Delrin/KnuckleDelrinBushingKit.pdf
Differential mounting:
This is yet another area that deserves some attention in regards to reducing undesired movement. The stock rubber mounts allow the differential case to move significantly under heavy acceleration, especially as they age/fail. Replacing these components with a quality polyurethane will make a notable reduction in differential case movement, which is a step in the right direction. There are a number of suppliers of both polyurethane and aluminum differential case to IRS mounts. The aluminum mounts will prevent any movement of the case, however they may result in a noticeable increase in NVH. When it comes to the rear mount, which attaches to both the IRS cradle and the differential cover, there are a few different paths. One common, and cost-effective, method is to simply place a bolt through the rear mount, preventing the inner and outer halves from moving in relation to one another.
Another relatively new option is to run a polyurethane bushing in a alternative mount design, such as the one offered by Performance Art Works. If you’re handy with a welder, you can make your own at home without much difficulty using a polyurethane 4-link end and some flat stock.
Pictures from SCP: https://supercoupeperformance.com/partBrowser.aspx?partId=833
Regardless of what method you choose to employ, I highly recommend either reinforcing the differential cover with a diff cover brace or replacing the cover with a sturdier version. LPW, FRPP, Fore Innovations, and Control Freak all offer heavy duty differential covers, and far, far more suppliers of differential cover braces exist.
The LPW cover:
Without bracing or replacing the stock differential cover, you run the risk of snapping the mount right off.
I hope that this short intro to MN12/FN10 suspension bushings proves helpful to you when choosing the proper replacement parts for your vehicle.


