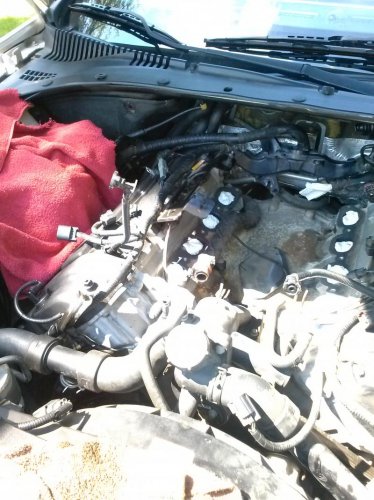
GenII LS8 Cooling System Overhaul

So I did a cooling system overhaul on my 2003 Lincoln LS8 this August of 2013. I couldn't have done it and wouldn't have even attempted it without the excessive help of this forums great community. I have been very strapped for time due to my wife and step son, as well as my occupational slavery. But as promised in my previous thread, here is an in depth thread on your cooling system replacement for your 2nd Generation Lincoln Luxury Sport 3.9L V8. I'm no professional at making nice threads, but I'll do my best to make this clean.


Let's start with a parts list. This list will contain the part numbers as well as the PNC's from Ford.

(Part Number) (PNC)

* "8548A" / "4Z-8548-AD" (Main Plastic Body)
* "9N499" / "9Z-9N499-AC" (Plastic Elbow behind Main Plastic Body)
* "8592" / "4Z-8592-AA" (Plastic Facet that attaches to Main Plastic Body, it houses the Thermostat Assy)

The 3 parts listed above are the dreaded cooling plastics that tend to get stress cracks and leak and/or allow air to enter your cooling system. This allows your coolant to boil, which results in your vehicle overheating.

(Part Number) (PNC)

* "HR1" / "707299-S300" (*top* O-ring for the 9N499 to 8548A)
* "8255B" / "4Z-8255-CA" (*bottom* O-ring for the 9N499 to engine block)
* "8255A" / "JV-8255-CB" (The 2 O-rings from 8548A to front face of engine block)
* "8590" / "9Z-8590-AB" (Large O-ring from 8548A to 8592)
* "9439" / "9Z-9439-AA" (Intake Manifold Gasket)

The 4 parts listed above are the various O-rings (gaskets/seals) that are contained within/between the 3 cooling plastic components (8548A, 94N99, and 8592). The 5th part on the list is the Intake Manifold Gaskets. If you're going through the trouble to replace all of your cooling system plastics.. you should replace your Intake Manifold Gaskets as well since they are cheap and you will have the Intake Manifold off since it's highly recommended to remove it to install the "9N499" cooling plastic elbow. There's a way around removing your Intake Manifold, but it's just as much work to wrench around it rather than take it off.

(Part Number) (PNC)

* "8A080" / "5W4Z-8A080-AA" (Radiator Overflow Assy, aka "Degas Tank")
* "8575" / "9Z-8575-AB" (Thermostat Assy)
* "8548B" / "4Z-9F814-AA" (Rubber Hose from Block to 8548A)
* "8260" / "4Z-8260-BB" (Upper Radiator Hose)
* "8286A" / "4Z-8286-CB" (Lower Radiator Hose)

The 5 parts listed above are the Degas Tank, Thermostat Assy, Rubber Hose that runs underneath Intake Manifold, and the Upper/Lower Radiator Hoses. I personally didn't replace my Upper and Lower Radiator Hoses because I inspected them and they looked good. Now looks can be deceiving and I highly recommend replacing them. I simply didn't do it because I have a friend that is going to fabricate some for me. The radiator hoses contain plastic in relativity of your other plastic cooling components which will stress crack as well.


Alright, now that all the main/necessary parts have been listed.. I can provide some images and advice. This won't be a complete guide or step by step process, but it should assist you in battle.

View attachment 828462360
Intake Manifold Gaskets (9439)
View attachment 828462361
Hose that runs underneath Intake Manifold (8548B)
View attachment 828462362
Degas Tank (8A080)
View attachment 828462363
Thermostat Housing (8592)
View attachment 828462364
Plastic Elbow that's underneath Intake Manifold (9N499)
View attachment 828462365
Main Plastic Body (8548A)
View attachment 828462366
Thermostat Assy (8575)
View attachment 828462367
8548A, 9N499, and 8592 assembled together.
View attachment 828462368
Thermostat Assy (8575) correctly installed into Thermostat Housing (8592)


Alright guys, unfortunately my wife just showed up and I already got the look. I'm making this thread at my mothers house by the way because we don't have a computer at the house. So I have to get going. Unfortunately this thread is going to be a parts list for the time being, until I get some more time to finish it. I have several other photos that are great for preventative damage throughout this installation process. Sorry I couldn't finish it. God Bless you all and your LS's.
Awesome pics, how does the middle assembly attach to the dwn pipe into the intake? I have leak were those two connect
 
Awesome pics, how does the middle assembly attach to the dwn pipe into the intake? I have leak were those two connect

There's an o-ring seal.
You're going to find that the plastic of the 9N499 pipe is rotting and that's why it's leaking.
 
Alright,

So I've finally got some time to finish this thread, or at least complete some more of it. I have about an hour and a half window before I have to go pick up my wife from work. We have an ultra sound appointment for my first child, her second. So I took the day off (Big ass smile). I can't currently edit my thread, but I'm getting in touch with staff so that hopefully they can allow me to edit my thread and complete it. But I figure I might as well use the valuable time I have now to get some of it done, then I'll just move it to the top of the thread later. So here goes...


I'll start by saying that this is FAR from a step by step write up on the process. And that I'm not going to tell you exactly which order to disassemble and reassemble for this install. Simply because it's been a good 6 months since I did it, and I'm not going to mislead or give false information. That being said, I'm going to provide you with some preventative damage info, tips, as well as some photos.

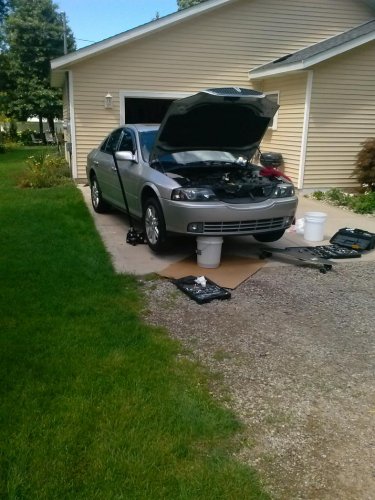
First off, you don't need a garage. Would one be convenient, of course. But if you can turn a wrench and are at or above par with the knowledge of common society (Hopefully above par), you can do this job. Give yourself the peace of mind by doing it yourself, and spend some quality time with your baby. Want to see the exquisite workshop I used to complete this job?
casephone 164.jpg

It took me a good week and a half or so. I'd wake up at 8am and work on it until 2pm. I'd then shower and go to work from 2:30pm to 1:30am. Don't be alarmed or overwhelmed, you can do this much faster than me. I'm meticulous with my car. Everything I disassembled, I also cleaned to showroom condition. When I disassembled something that gave me access to clean other areas I could otherwise not get to, I did so. You don't need to do all that. Not to mention I was practically babysitting my 2 year old nephew that was moving my tools all around and trying to "Help".

If you want this to go smooth, give yourself a good weekend. Or two consecutive days with nothing on your mind but the curves of your LS's ass. Get all the tools together that you will need, and be organized. Keep everything you disassemble together with accompanying parts. I.E., when you unbolt something and remove it, put the bolts back in it and thread them in a few threads. There's nothing more irritating than spending 45 minutes looking for a bolt that was in your pocket the whole time. Trust me.

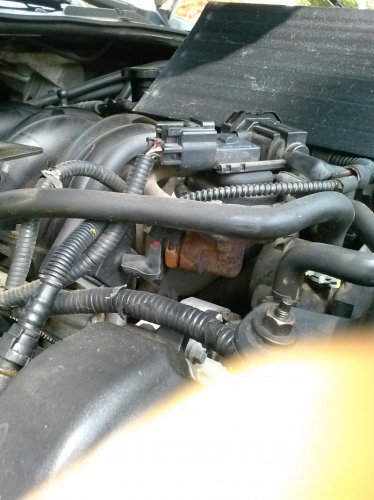
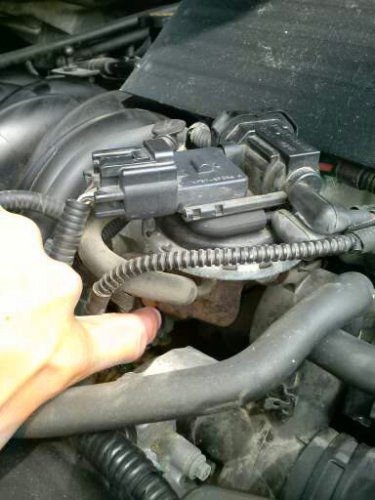
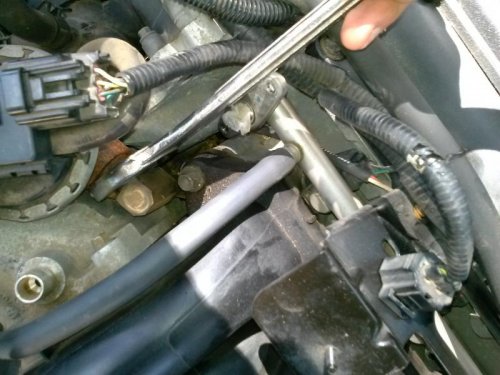
Now for some tips to prevent you from making this job more expensive than it needs to be. Once you've removed the obvious things such as your Engine Cover (If you have one), your intake assembly etc., you're going to be getting into the meat. I personally went the route of removing the entire Intake Manifold assembly. Simply because I was going to replace the Intake Manifold gaskets while doing all the cooling plastic components (I highly recommend replacing the gaskets, can't think of a reason not to). If you decide to do this as well, there will be a point where you will need to disconnect the EGR valve's exhaust pipe. It's the metal pipe the runs from the EGR valve then under the intake towards the rear of the car. Here is the EGR valve assembly and of the exhaust pipe I'm referring to.
casephone 139.jpg
casephone 141.jpg
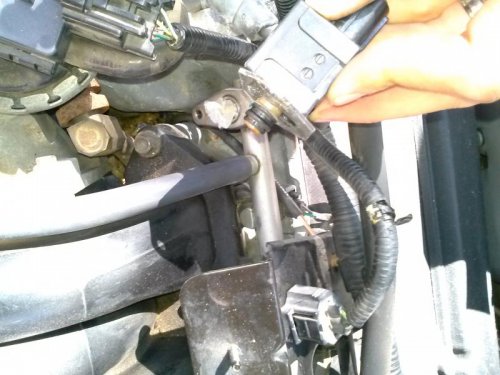
The issue here is the fact that the nut that connects this exhaust tube to the EGR valve assembly is not only snug, but it emits hot gases and goes through hot/cold phases often (Engine on and up to temp, engine off and cooled). Therefore this bolt is also adhered somewhat from the years and years of engine cycles. Anyhow, I personally used an open end wrench but I can tell you right now I had to use some force to turn this nut off. The issue that arises is when you attempt to break the nut loose by putting some muscle to the wrench, your fuel pressure regulator/sensor is DIRECTLY in the damage path of your wrench. There are two bolts that hold this unit in place, I highly recommend you remove them and move it out of the way. If you don't, your chance of breaking it is greater than your chance of not breaking it. Anyhow here is a pic of the unit removed.
casephone 160.jpg

And here is a pic of the wrench having room to do it's job.
casephone 162.jpg

Also, be sure to have some paper towel or shop towels handy. There will be many parts and areas sucesptible to dirt and other contamination, plug those areas up.

Now let's say we're at the point of removing the intake manifold assembly. This may be normal to most of you, but I was in WIRING HARNESS HELL. Personally I unbolted the brackets on each sides of the Fuel Rails that held all the Fuel Injector wiring harness/clips in place. I then disconnected all of the wiring harness clips. Be careful when you do this, if it seems like it's hard to disconnect then you're probably not doing it right. These clips are brittle, be gentle. Look for the release tabs and spend some time inspecting before your go crazy. Patience is key.

Now, for what I'm sure everyone knows to be a COMPLETE pain in the ass, removing the wiring harness junction behind the Intake Manifold. This pissed me off beyond words. And no, not the removing of the well known PITA nut. My issue was even more irritating, but I'll get to that. When you are removing the wiring harness junction behind the Intake Manifold, it is held in place and mounted by two or three nuts. And one of those is not the friendliest (Like if it were to send a Facebook request I'd instantly deny, send a raging message, then block). The problem is this particular nut is directly behind the junction plastic, and there's only an inch and a half between it and the firewall. Not to mention you're basically doing this blind, your fingers are your eyes here. I personally used a 1/4" drive rachet and a socket. And I won't give you the "If I had to do it again I'd...." speech, because once I got the bolt off I drop kicked it into the yard. But this bolt wasn't even the most irritable part of this wiring harness junction removal. My issue was the fact that I dropped my rachet and it somehow fell down and got all snugged up in the transmission area. Like it got stuck on the cooler lines or something, and I spent literally an hour to an hour and a half slowly jerking it here and there until I eventually got it all the way accross the top side of the transmission and had it fall out the back. I never swore so much in my life.

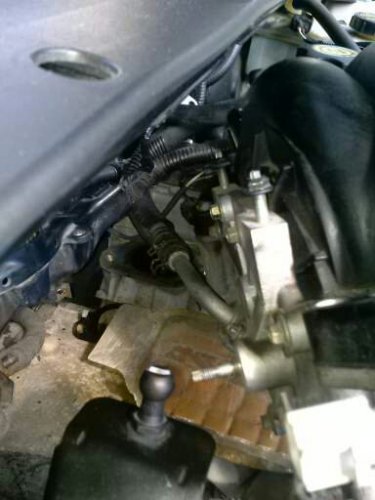
Anyhow, once the wiring harness junction has been freed up you can now remove the Intake Manifold. Break the bolts loose and take them out. There are two bolts near the back that have a thread on top of them. Remember to put these back in the same spot, you have things that mount to them. Once your Intake Manifold is free, remove it with caution. Do note that there is a hose connected to the bottom rear of the Intake Manifold. You will not be able to remove it entirely until you disconnect this hose. Here is a picture of the hose.
casephone 169.jpg

Also be cautious when removing this hose, for it doesn't like to come off easy. DO NOT scrape or dig into the metal line that it's connected to. If you do, there's a good chance it will leak. If you need to, step away and yell at your dog because it's his fault. Then when calmed down, continue. Be patient, don't break stuff.

Once you get that hose off, you can remove the Intake Manifold completely. Handle with care, it's very expensive and just as fragile.

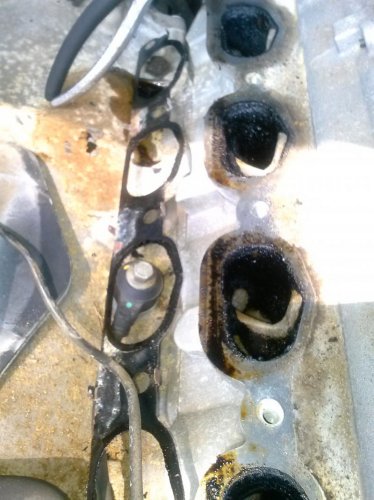
Now you will notice that once you remove the Intake Manifold, there should be two heat insulators. If there aren't, then your Intake Manifold has been removed before. I don't know the importance of these insulators, but they were their from the factory so I'm sure they serve a purpose. Personally I'd assume they deflect some of the EGR exhausts heat and keep the Manifold cooler. Anyhow, take note of how these insulators are in place because they need to go back in the same way to serve their purpose. Now my 2003 Lincoln LS 3.9 had 95k miles when I did this, and my Intake Manifold Gaskets looked like this...
casephone 172.jpg
casephone 173.jpg

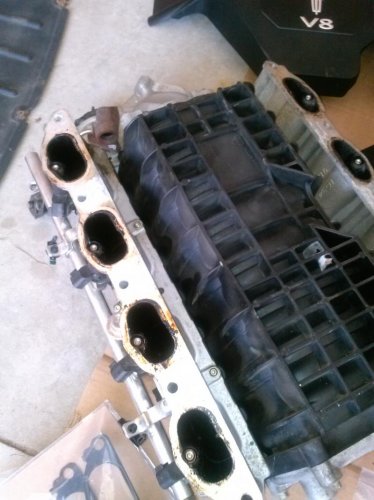
I don't recommend skipping a new gasket install. Anyhow, clean up your Intake Manifold and Engine Block ports and surfaces real well. And don't be lazy about it, the cleaner and smoother the surface will be the cleaner and smoother the seal. Once you've cleaned them, plug your ports to prevent any contamination or foreign objects entering your valve system...
casephone 177.jpg


Sorry guys but this is going to have to be continued. I plan to continue it today, but it's 11:30am and I have to go pick up my wife for our ultra sound appointment. God bless

casephone 164.jpg


casephone 139.jpg


casephone 141.jpg


casephone 160.jpg


casephone 162.jpg


casephone 169.jpg


casephone 172.jpg


casephone 173.jpg


casephone 177.jpg
 
Nice. I just ordered all my coolant pieces and will be doing this in 2 weeks. However, I am cutting the bolts off the elbow piece.

BTW thanks for this thread, helped a ton with ordering and I am sure I will use it for references.
 
Nice. I just ordered all my coolant pieces and will be doing this in 2 weeks. However, I am cutting the bolts off the elbow piece.

BTW thanks for this thread, helped a ton with ordering and I am sure I will use it for references.

No problem man, I should have it done before you start.
 
Nice. I just ordered all my coolant pieces and will be doing this in 2 weeks. However, I am cutting the bolts off the elbow piece.

BTW thanks for this thread, helped a ton with ordering and I am sure I will use it for references.

My suggestion:

Order two (2) new bolts for the thermostat housing (plastic to plastic parts - 8592 to 8548). I believe the part number is W500014-S426 ($2.42 each from Ford Parts Giant). These bolts are perfect for replacing the two bolts at the back side, under the Intake Manifold, of the Plastic Elbow. They are just the right length to fit between the block and manifold when reinstalling the Plastic Elbow (9N499).
 
Dam, I already ordered a pair of the bolts that are for the elbow.
 
Had the upper rad hose crack over the weekend and the thermostat housing break also. Called everywhere and the hoses are no longer in stock. The supplier is having issues getting them built for Ford. I even tried Ford Parts Giant. Finally found them at Tasca.
Question, though, where did you guys find the Orings and gaskets, as they are not on Tascas web site. Also Tasca doesn't have the 2W9Z-9N499-AC or 3W4Z-8548-AD. So for now I just order the upper and lower rad hoses!! FANTASTIC write up by the way!!
 
I just did mine, got all the parts from Ford parts giant, they were a few more bucks but had everything in stock and it arrived in a few days.
 
WOW, I just called them, and they told me they were out of stock. HMMMM, maybe I should try again with a different guy, probably get a different answer.
 
Ended up getting all the parts from Tasca. They were already a few bucks cheaper then Ford Parts Giant, plus i was able to get a promo code from them for 20% off of domestic shipping = S197
The only part I did not get was the Degas bottle as the extra $140 is not in my budget.
Thanks for all the advice guys and great post!!!
 
Had the upper rad hose crack over the weekend and the thermostat housing break also. Called everywhere and the hoses are no longer in stock. The supplier is having issues getting them built for Ford. I even tried Ford Parts Giant. Finally found them at Tasca.
Question, though, where did you guys find the Orings and gaskets, as they are not on Tascas web site. Also Tasca doesn't have the 2W9Z-9N499-AC or 3W4Z-8548-AD. So for now I just order the upper and lower rad hoses!! FANTASTIC write up by the way!!

When I did mine I forgot to order those O-rings. My local Lincoln dealer was unable to locate the parts, my local Jag dealer had them to me in just a day or so. It is, after all, a Jaguar engine AND that engine design is either still in use or was in use until very recently (I don't keep on top of Jaguar).

The only part I did not get was the Degas bottle as the extra $140 is not in my budget.
Thanks for all the advice guys and great post!!!

This you will come to regret. When I did mine it was for a broken water hose. I replaced everything, and discovered when I did that my degas was cracked all over. It wasn't leaking out, was likely sucking air in though. Luckily the degas can be replaced independently of everything else, so I'd look at replacing it in a couple of weeks when the funding is available.
 
I will replace the degas bottle in a month or so when the budget permits, just tired of looking at the car sitting in the garage with the hood up and kitty litter all over the garage floor.


Update: Tasca informed me that the upper radiator hose 4Z-8260-BB was on back order from Ford due to a supplier issue and would not be stocked for at least a few weeks. I called a local Ford dealer and they told me the same thing, they searched the national part database and could not locate any. So I called a local Lincoln dealer and they confirmed the info. Called 5 or 6 local junk yards trying to get this part and no -one had an '05 V8. Finally after what seemed like days of searching the web and calling part stores I found a place in Ohio called Ricart Auto and they had the part IN STOCK. Ordered and shipped to my door for $68. I am still crossing my fingers that I get it by Friday and the part is what they say it is!!!
If you guys can find that part, better get them and dump them on ebay for double the price.
 
Just (well not just..... about 5 hours ago...) finished this job. What a pain!! I did all the removal last evening which took about 2 hours (dinner was involved). Today's install took about 3 hours; including the bleeding. There was also a fair amount of piddling involved.
 
thats about what it took me, three steady hour of work.

however one good hour was spent (pretty much like every time i work under the hood) looking for one small bolt I dropped that never fell through... also covers running down the street (literally) to the hardware store to find a replacement! lol I swear, I don't know where this secret shelf or box in under here, but its got a few bolts, and at least two short 1/4" 7mm sockets in it!

I know what you mean!! I lost one of the noise radio interference ignition capacitor nuts. I heard it bounce around somewhere down low and never found it. Fortunately I had a spare nut I could use.
 
TooManyToys: what type of tool did you use to reach under there to remove the back two bolts?

That's why you need to at least loosen the intake manifold and raise it an inch or so. Those bolts are about 3/8" too long.
 
Of course, if you remove the manifold, you can replace that throttle body heater hose while you are there.
 
Me Too

Well...

At 130k, I just became one of the lucky ones to join this cooling system nightmare. First... a thank you to SoulSoak and Joegr for the part numbers. My car suddenly started overheating without warning, and I had a suspicion that it was the thermostat. Seems I was right to a point, because the inside of the housing had disintegrated, causing the thermostat to jam up. I'll try to post pics later. I knew something was up when the housing was under "spring pressure" as I was taking it off. It seems the thermostat housing is a ticking timebomb for all of the LS's, (Gen 1's crack and Gen 2's fall apart internally).

I managed to get everything apart without pulling the intake. I just removed the throttle body, (after separating it from the EGR valve and all related hoses), and filed away just enough of the flange on the intake to get the back bolts of the plastic elbow out. The bolts on the throttle body are accessable enough, and I backed them out to 1 or 2 threads holding them,,, and then used a "plunger type" claw tool to back them out the rest of the way so I didn't drop them.

With the TB removed, I think there is just enough room to get a pair of needled nose pliers and a screwdriver in behind the elbow mount, to replace the throttle body heater hose. Also,the back bolts on the plastic elbow will be shorter when reinstalled. I plan to run a die on them, cut them off, and taper grind the end. Then back the die off the bolt.

The upper hose split on mine also at the plastic wye, and as of last week the upper hose was available in limited supply through ford dealers for the nominal $70. Planning on replacing every hose and plasctic part, and water pump... some through RA and others through my local dealer since they are nice to me and give me discounts, (plus I can use my Ford "Owners Advantage" card).

- - - Mike - - -

I don't think I would ever thin the intake flange. I also cut the bolts, but after thinking it over I wondered why as I will never have to do this again. I won't cut the bolts when the time comes on my LS.

Why not just replace the hard plastic lines with vacuum line and connectors. I did that on my LS a couple of years ago for, IIRC, less than $15.

Never mind.... I thought you were talking about the vacuum lines. Those break and crack with the most minor of jostling.
 
I didn't file the intake down any thinner than it already was in other spots. In fact, all I really did was "notch" the outer edge of the intake flange with a rattail. In reality,,, the bolts aren't 3/8" too long... but more like 1/8" or less. The bolts don't need to clear the elbow housing... Just the threads in the block. You can then lift up the housing and pull it out with the bolts still in the holes. Keep in mind the the elbow housing has 4 plastic tabs on the underside that will break off if you don't lift straight up on the housing. Not a big deal if you have already removed the water pump first.

- - - Mike - - -
 
It's Done

Been driving for over a week now... "with no runs, drips, or errors", (or overheating). It is possible to do everything without pulling the intake. In a previous post, I mentioned how to get the elbow/gooseneck off, and I was also successful in replacing the throttle body heater hose, (under the intake), without pulling the intake. I just used 2 long wide flatblade screwdrivers to walk the clamp off by prying/squeezing simultaneously on both sides of the clamp with the screwdrivers wedged against the back ears of the gooseneck housing on the block. Once the clamp was walked back far enough, I got a screwdriver between the back of the gooseneck mount and the hose, and pried it off the nipple.

Getting the the new TB heater hose back on, I used a hollow oval type of hemostats at an angle, wetted the inside of the hose, and wiggled it back on as I pulled the hose back on the nipple towards the gooseneck housing on the block. I then walked the clamp back on the same way I took it off. Total time for doing this, (once I studied the problem for about 10 minutes), was about 5 minutes. Total time for R&R the throttle body is about 15 minutes, (including removing all respective hoses from the proper ends, plus unbolting the EGR and rotating it out of the way, and back in place). So for the knowledgeable mechanic, this only takes about 20 minutes... versus an hour plus for removing the intake, with no worries about debris getting in the engine or messing up any part of the fuel system.

One thing to keep in mind. Prying with screwdrivers against the gooseneck block mount will create some burrs. Use a fine "mill file" or honing stone to makes sure the top of the gooseneck block mount is smooth, that way you get a flush mount between the block and the gooseneck.

I'm one of those "A" type personalities... that thinks, "as long as I'm in here I might as well replace...". I hate going into the same spot twice, so I replaced alot of extra hoses that no one has mentioned. With 130K on the clock, it seemed like the perfect time to do some preventative maintenance. I replaced the hose from the wye on the upper to the DCCV. I also replaced the hose from the thermostat housing to the circulator pump, (which is located below the DCCV). Upper hose was split at the wye, but also replaced the lower hose. Also replaced both throttle body heater hoses. Only hoses left are the combo rubber/aluminum ones running from the DCCV to the heater core, (not looking forward to that when the time comes). Also replaced the cap on the thermostat housing and degas bottle... plus water pump and a new drive belt... and degas bottle.

Total cost was roughly $900 for all parts, including gold coolant from the dealer. Most parts were bought from the dealer, because RA didn't have much in stock at the time of purchase. Other parts were bought from the dealer... just because if I received a bad part, the turn around time on a replacement would be much easier and shorter, but so far... no bad parts. No bad parts ever from the dealer in 10 years, except for one bad water pump for my F-150 5.8.

Total wrench time was roughly 7-8 hours including bleeding the system. The average guy should expect about 12 hours, so plan a full day off for a project as in depth as I went. Most of the hoses came with clamps already glued in place... including the degas bottle. Some of the clamps did prove to be in a challenging "orientation" to get released when the hose was installed, but the proper pliers or sized scewdriver at the proper angle got them released and in place. The MAC Tools P28A, (or similar type pliers), will be your best friend for most of these "spring type" clamps. Various scewdrivers of different lenghts will do the rest in a "push" or "twist" movement.

Some extra notes::: If you have a factory oiler cooler setup on your LS V8... the orientation of the clamps on the cooler hoses will most likely cause you to remove the oil filter before you can slide the clamps off. Make sure you reinstall the oil filter before you pull the hoses, otherwise you may find yourself doing a premature oil change when the coolant dumps into the filter mount. Also... work your way from the top of the motor down toward the bottom when removing parts,,, and reinstall from the bottom up. Except for the upper and lower radiator hose. The lower radiator hose should be the last to go on. That way you have room for your arm to get in to some of the clamps on other hoses. This also allows you to get the proper torque on the WP pulley bolts. Install the drive belt before final torque on the WP pulley bolts. You can push on the belt with one hand,,, while torquing the bolts to the final spec, without rotating the pump.

Notes continued::: Get yourself a "click type" torque wrench,,, not a "bar type". You may not be able to accurately read a bar type torque wrench at the angle you are using it... plus they are less accurate anyway. Also... get a set of factory manuals if possible. They can be found on "The Bay" for $35-$70 the last time I checked. They are fairily simple to understand, and give proper torque specs, and sequence for any part you are working on... plus alot more. Most of the bolts you will be working on for this process will be torqued to 89 inch pounds,,, except for the water pump and WP pulley bolts. WP bolts are 71 inch pounds + 90 degrees. WP pulley bolts are 89 inch pounds + 45 degrees, (thus the importance of installing the belt first and and applying extra pressure on the belt with one hand while torqing the WP pulley bolts. Lastly... you do not need to loosen the belt tensioner to get the belt out. If you have a long enough ratchet,,, all you have to do is rock the belt tensioner back and forth, and the belt will slide in or out from between the timing cover and the tensioner.

I'll see if I can send pics of my invoice from the dealer. As I have said before in other posts... make nice with them. They can be your best friend,,, and will give you discounts if you build a relationship with them. All you have to do is ask. Mine is getting a Christmas car this year for sure!!!

More pics will follow,,, if I can get this site to cooperate with my dial-up connection.

Best Wishes,

- - - Mike - - -
 

Members online

No members online now.
Back
Top