Degas bottle replacement with pics

Outstanding tech write-up. I don't need to do this yet, but am glad that this was here so I could get some tips/tricks before I do!

You might consider purchasing the Ford replacement Degas Bottle. It comes with the two hoses attached (the hose to the bottom of the Degas Bottle and the bleed hose). Since you have new hoses so you can be more aggressive when removing the old hoses. The Ford part even has new clamps on the hoses. They are the snap type like the original. YOu slip on the hoses then trigger the snap to complete the clamping action.

Ed
 
Go to Fordpartsgiant.com and enter your VIN to research part #s and diagrams. They have the bottle for $145ish
 
That blows... How much is the motorcraft piece and do you have the PN handy?


Replace Degas Bottle with OEM part only. (p/n 5W4Z-8A080-AA)

Hey look what's this ? http://www.lincolnvscadillac.com/forum/showthread.php?88661-Re-amp-Re-OEM-Degas-Bottle-GEN-1-V8
a link to a degas bottle replacement article with pics and P/N, imagine that, found it using the search function, how'd that happen?


Sorry Lee, not trying to thread vs. thread jack or anything. (Honestly!)
 
Hey Guys,

Another trick to getting the lower hose off is to:

lower hose.jpg

wrap a shoe string around the lower hose, and tie a knot.....

wheel well.jpg

feed the string through the wheel well and pull on the hose.

After about 3 hours of trying to get the lower hose off with channel lock pliers, my dad and I were able to pull the hose off in about 5 minutes once we got the string on the hose and pulled.

I can update post later with a picture of the type of knot we used

lower hose.jpg


wheel well.jpg
 
Looks like I'll finally be banging this job out this week. My oldest son is buying the car form me as he fits in it better than most other cars and I usually run the Harley to work instead of the car. Anyway, the degas was doing the stealth leak, ran the coolant low and left him on the side of the road last week with an over temp. Scared the crap out of him. Limped it to the local Walmart and filled the thermostat area and it ran fine the rest of the week but started leaking coolant at the degas after sitting. Top was dry, bottom was wet.

BTW, Tasca is now up around $185 to ship the bottle and a new cap to MD...
 
So, spent some time doing the swap. Overall not too difficult. My strut bolts didn't want to come out so I had to bend the mounting tab to get the new bottle in place. While the car was on the stands and I was changing the oil I popped the radiator cover off and was amazed at how clogged the radiator was. The bottom 1/2 was covered with debris. I dropped the belly pan and the plastic covers to clean it out. I had a tennis ball sized mud dobber nest, ten oak leaves, 3/4 of a pigeon's worth of feathers, two complete Monarch buterflies (1 yellow, 1 orange), a cellophane cigarette wrapper, a plastic slice of cheese wrapper and a ton of bugs blocking the air path (no wonder the fan ran so much). Most of this crap would have fallen out the bottom without the belly pan blocking the path. I easily filled a one gallon bucket with crap.

Some advice, lift the rear of the car off the ground as well as the front. I got about 1 gallon of coolant out the radiator and another out the degas bottle hoses on the floor. Also, be sure to remove the radiator access and clean it out. Pulling the top cover will now be part of my oil change procedure.

Hope this helps the next guy.
 
I have seen a few people asking about a how-to for the degas bottle (coolant reservoir) replacement lately. I haven't seen a write up myself so I had some free time and figured I would make one up. This is not a difficult job at all, it took me around an hour or so with bleeding the cooling system. I hope this helps some people.


View attachment 828531649

1) Drain the cooling system according to the tech article How to Drain the Lincoln LS Cooling System

2) Remove the windshield wiper arms. Pull off the rubber cap and remove the nuts. Pull up and down gently on the arm until it comes off. You may want to mark the position of the arm before you remove it so you can replace it in the exact same position.
View attachment 828531650

3) Remove the pin clips that hold the cowl covers on. Push in on the center and they will come out. Remove both cowl covers
View attachment 828531651
View attachment 828531652

4) Remove the 7 bolts holding the strut tower/firewall brace and remove the brace
View attachment 828531653
View attachment 828531654
View attachment 828531655
View attachment 828531656

5) Remove the 2 bolts and 2 hoses on top from the degas bottle. Leave the bottom hose attached to the degas bottle
View attachment 828531657

6) Remove the pinch clamp on the lower hose from the heater core pipe located behind the drivers side valve cover. I would throw this clamp in the trash and use a regular wormgear hose clamp. The factory clamp is hard to put back on considering its location
View attachment 828531658

7) Install the lower hose on the new degas bottle in the same position as the old bottle
View attachment 828531659

8) Install the new degas bottle and connect the lower hose to the heater core using a worm gear hose clamp to make it easy
View attachment 828531660

9) Re-install the 2 degas bottle bolts, 2 upper hoses, strut tower brace, cowl covers and wiper arms

10) Fill and bleed the cooling system according to the tech article referred to in step 1 and you are done

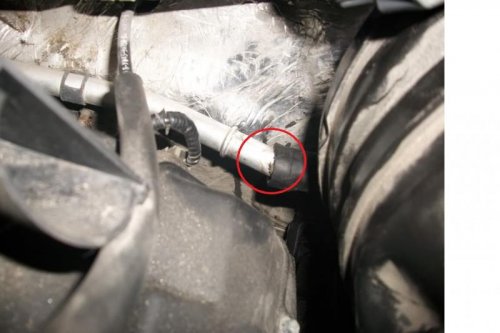
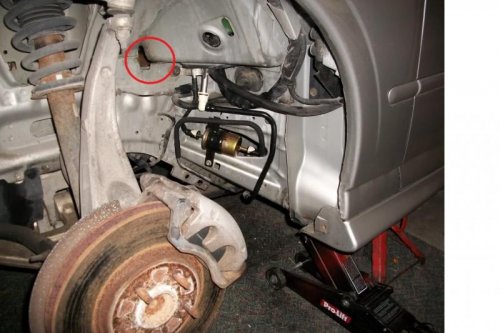
I'd like to thank you for the in-depth instructions given on changing out the degas tank. The pictures, especially #6 (THE hardest step due to lack of access), was the most helpful by far. The link for bleeding worked like a champ! Having such knowledgeable folks on these forums gives us noobs a real leg up on repairing our babies! I got extremely lucky in that my tank lasted 174K miles before having to be replaced. Thanks for sharing your knowledge with us all, it saved me about $500 from a shop doing it! Oh, and whoever suggested the long-nose Visa Grips gets a double gold star!! The spring clamp was easy, getting the hose off and back on again is where all my time was spent. Thanks much, again!!
 
So I fixed my problem of not purchasing Motorcraft ridiculous price of 3 bills.
I bought a replica off brand (such as dorman. You can find them)
Previously I had walked into an AutoZone and saw that quite a few fix it products were on sale. So I grabbed four packs of JB Weld (Radiator Weld) Edition. It retails for $15 a package, but I managed to grab them a $4. I was thinking to myself "score"
So I coated my new Degas bottle with this epoxy that is specifically designed to fix plastic and resist radiator fluid. So I'm thinking this will last longer than the original Motorcraft product for not even ⅓ the price.

IMG_20190704_150721.jpg


IMG_20190704_150711.jpg


IMG_20190704_150704.jpg


IMG_20190704_150655.jpg


IMG_20190704_150524.jpg
 
The bottle flexes as it pressurizes and de-pressurizes. The epoxy will crack and flake off.
 
and I'm pretty sure the most common failure point on the aftermarket bottles is the seam where you cut off the epoxy...
 
and I'm pretty sure the most common failure point on the aftermarket bottles is the seam where you cut off the epoxy...

Maybe, but my two cracked in the middle of the body.

Not one of mine, but something like this:
20170823_130210-jpg.jpg
 
Last edited:
Maybe, but my two cracked in the middle of the body.

Not one of mine, but something like this:

Were yours Motorcraft? If not, I could be thinking of one particular "brand" of bottle, as I believe there's at least two types. One had the unique cap thread, one matched OEM
 
Were yours Motorcraft? If not, I could be thinking of one particular "brand" of bottle, as I believe there's at least two types. One had the unique cap thread, one matched OEM
Motorcraft, the original ones the cars were born with at the factory. The replacements I used were Motorcraft too. So far, so good. (Note, we are talking about two LSes, each with over 200K miles now.)

I wouldn't touch Dorman or the others like it. I might be willing to try the Jaguar one.
 
Motorcraft, the original ones the cars were born with at the factory. The replacements I used were Motorcraft too. .

Yeah, I was talking about the aftermarket bottles being prone to splitting at the seam. That JB'd tank may miss the failure point entirely
 

Members online

No members online now.
Back
Top