What did you do to your LS today?

I hjad the LED staying lit problem when I did mine, since all of the interior lights were on the same circuit, I just installed a high resistance resistor across the wires at the pass footwell (easiest to get to) and that took care of all the bulbs staying dim.
 
Would like to do a few things for my LS, but income seems to be preventing me from doing so.

But...I did just replace the thermostat, housing and cap, the other plastic housing mounted to the intake, all the O-rings there, upper hose, Serp belt, idler pulley, coils and plugs and put in new gold coolant, fuel filter, cleaned the throttle body, replaced the air and cabin air filter (Still can't figure out how to get at the under-the-seat filters )...oh and an oil and filter change and.......De-greased/cleaned the engine.
Got my parts from Tasca

2005 LS8...91k
 
...(Still can't figure out how to get at the under-the-seat filters )...

Move the seats forward and up (not required, but makes it easier). From the back, reach up under each seat and feel for the round thing. Grab it and turn counter-clockwise for a fraction of a turn and pull down.
 
Really fun for me....I dropped it off and it was magically replaced :).

WAAAAAAAYYYYYY too cold right now to be doing the work myself. But from what I've read, ya it didn't sound like a good time.
 
Replaced DATC. Again. Original stopped running the aux pump. Junkyard replacement lasted three years, then wasn't fully closing the driver side heater valve. Thought it was the valve so replaced that. Nope, something slightly wrong with the DATC itself. That was an expensive and time consuming alternative to running through the test procedure in the manual. :( I had replaced a leaking cap on that board previously....

Snagged two complete units and one bare circuit board at the Pick'n'Pull. Someone had cut off the display from the bare board. One of the units wouldn't drive the blower motor, the other unit wouldn't engage the A/C. The bare board works, but had to swap over the display from my unit. Thankfully the display was compatible across different part numbers.

The board was from an '02, but the part number was 1W4H-18C612-AA, while my '02 unit was a 2W4H-18C612-AA. 2000 and 2001 are XW4H-18C612-BM or BN

I've noticed that "Auto" means slightly different things for 2000-(early?)2002 vs (late?)2002. Earlier units indicate A/C and recirc when auto is selected, and you can turn A/C and recirc on/off. Later units don't indicate, and pressing A/C or recirc takes it out of auto.

Now you know....
 
Valve cover gasket on passenger side on Saturday. Lost enthusiasm to do driver's side after this:

This lovely center bolt decided to snap before even reaching torque spec.

tmUadiyh.jpg


iuRyyVch.jpg


I think the extreme temperature swings these bolts endure make them very fragile.
 
agreed, hope it works..although a dodge ram's bumper will loosen things up a bit too!
 
The torque spec on those bolts is very low. Due to the design, the tightness of the bolt is not a factor in how much compression the gaskets get. Instead, the bolt only needs to be tight enough that it won't vibrate loose. I didn't bother with a torque wrench, sine it is so hard to fit it in for many of the bolts. I just used a very small wrench and made them reasonably tight.

If your repair was to just epoxy the broken bolt over the hole, then I can't see that working long. The whole point of those center bolts is to keep compression on the o-rings for the spark plug wells. Just sealing the bolt hole won't do that.
 
Yea I should have just done feeler tightening, I did that on the remaining bolts.

And yea I pumped it full of gasket sealer... Guess I will see if it leaks... Is there a place I can order individual bolts and the piece that it goes into? I don't know what to even search for. From what I remember those pieces seemed very specific for this valve cover.

I think, but am far from certain, that it is 3W4Z-6C520-BA . If I'm right, that gets you the spacer, the bolt, and even the top seal on the spacer. If I'm wrong, it get you one of the non-center valve cover bolts.

The torque figure given in the book is 89 lb-in. This is 7.4 ft-lbs. Very few torque wrenches go this low, and you never want to use a setting that is at the bottom (or top) of the range on a wrench. I always go back and look at the units twice. 89 ft-lbs would have been 12 times as much as actually specified.
 
Plus if I'm not mistaken, there is a required sequence to the bolt down tightening. Inwards to outwards I recall.
 
Plus if I'm not mistaken, there is a required sequence to the bolt down tightening. Inwards to outwards I recall.

It's a little more than just that, but yes that is correct. It looks like the bolt that snapped was the first one in the sequence.
 
Done so in order to achieve best even clamp down pressure for the internal gaskets.


Sorry for your troubles Drizz but as Joe expresses his concerns the even clamp down is needed to keep the internal plug well gaskets from leaking into the wells. I'm sure you know/knew that though.
 
Yea I definitely screwed that up, joe you are right and I was set at 80 ft lbs of torque, although I doubt I ever got to that level before snapping as it was SUPER overkill.

I just looked at that part number (thank you!) - that definitely appears to be what I need.
 
Last several days,the whole job was change out thermostat and housing,idler pulley, tensioner pulley,WATER PUMP,drive belt and antifreeze. Whenn I finished,the O-ring was leaky on the old Engine fill cap, so I ordered a new cap from Ford. I have a new O-ring on the old cap and it sealed fine with my Unpressurized system.....I went with the NEW cap anyway.
After installing the new engine coolant filler cap onto the new thermostat housing, I followed Ford's manual once again and did a second bleed of the cooling system,just to make sure I got all the air.
A little more came out....not much. Since the old thermostat and housing and cap looked almost like new,I stored them in the spare tire area just in case of a problem later.I can't see any of that deterioration yet in my plastic parts. don-ohio :)^)
 
Put it back on the lift for its winter nap. As it's my backup plan car for the winter, I did some travel last week and had a 5:50 AM flight out and a 12:20 AM return flight on Friday night. Decided to put the dedicated snows on and drive it to the airport, park for the week, and drive it out Friday night/saturday morning. Luckily I missed a snow storm but was ready. Worked great and it was fun to wind it through the gears late at night on the 3 mile ride from the airport. Driving a WRX for the winter, they have such different power ranges, but the LS does its baddest chest beating pulling second. I think it winds out at around 55+ and it is a great transition when the intake manifold tuning valve opens up the runners for a nice scream and burst of power. It's no V8 but the manual transmission helps equalize some of the V8's drive train losses, though I doubt it's much. Still love the LS after almost 15 years of driving one exclusively.
 
Last edited:


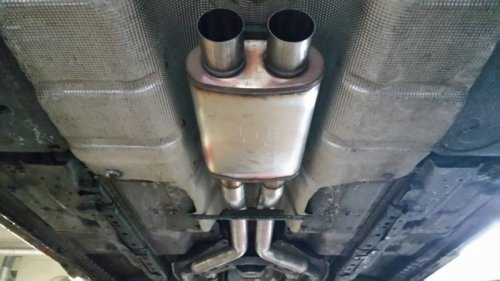
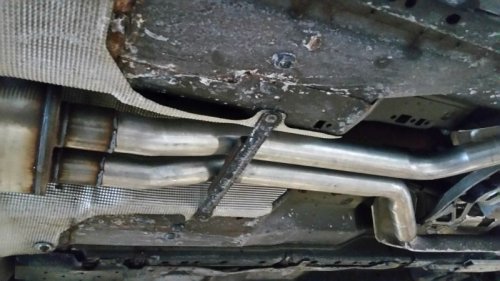
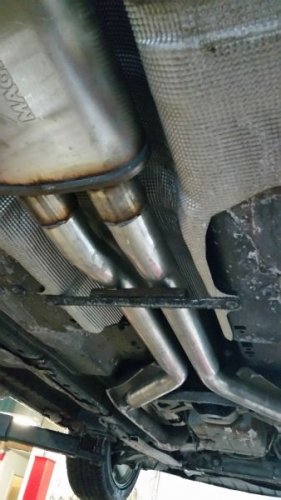
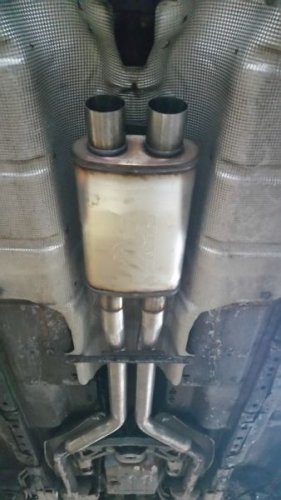
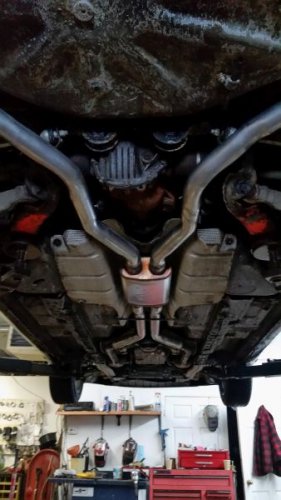
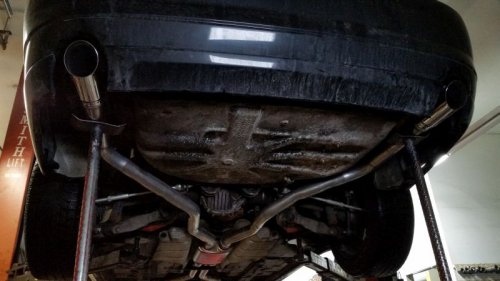
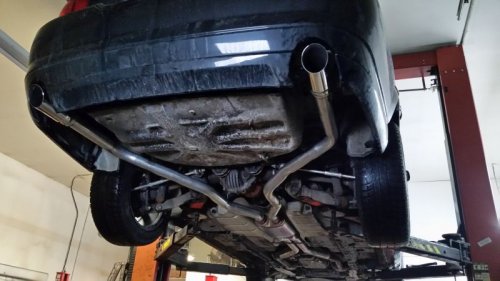
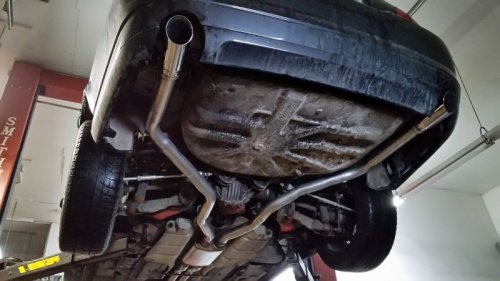
Had the 04 LSE V8 fitted with a custom exhaust this morning ... very BEAST and plenty of DRONE, just the way I like it.

Magnaflow # 11386 - 4" x 9" x 14" Dual In/Out Satin Stainless 2.5" True X core design.

Third CAT and Resonators deleted, 2.5" (not SS) piping, chrome tips added. (removed from 01 LS V8)


04.jpg


03.jpg


06.jpg 08.jpg 05.jpg


02.jpg


01.jpg


01b.jpg


Very pleased, guy did an excellent job on it, I much appreciated his attention to detail,
everything lines up nicely. 3hrs total labor time, 400$ cash out the door.


01.jpg


01b.jpg


02.jpg


03.jpg


04.jpg


05.jpg


06.jpg


08.jpg
 
Yea I definitely screwed that up, joe you are right and I was set at 80 ft lbs of torque, although I doubt I ever got to that level before snapping as it was SUPER overkill.

I just looked at that part number (thank you!) - that definitely appears to be what I need.

I just used a regular bolt. Something like M4 or M5 x 25 or 30mm?

Been there, kind of. I bought a torque wrench for the job. But I bought a ~40-250ft-lb wrench for these 89 in-lb bolts. I caught the mistake before I used the wrong wrench. However, my next mistake was not knowing how torque wrenches worked. For some reason, I thought they would keep clicking at the desired torque like a ratchet. (I now realize that would be a knuckle bashing monstrosity of a design) I snapped the same bolt because I just kept cranking, not realizing I was looking for a small click. Now I do what Robot suggested at the time and check the torque wrench at it's lowest setting first. Luckily, the bolt stretched until it snapped, rather than bottoming out. I thought I was having an impossible time trying to use an EZ-out because it wouldn't bite. It turned out it was actually rotating the bolt half a turn at a time from friction alone.

At least I learned. And now I have a torque wrench for my wheels. Holy crap is 100ft-lbs waaaay less than I thought. Especially when you have a proper wrench, not the garbage the factory gives you with extra room for rust in the socket
 

Members online

No members online now.
Back
Top