You are using an out of date browser. It may not display this or other websites correctly.
You should upgrade or use an alternative browser.
You should upgrade or use an alternative browser.
What did you do to your LS today?
- Thread starter RigsLS
- Start date
Ghost_Ls8
Dedicated LVC Member
yes I do always notice my front and back bumper have a yellower look to it in the sun depending on time of day , always hated that , I wanted to get them repainted but I am going to dip the car eventually


yes I do always notice my front and back bumper have a yellower look to it in the sun depending on time of day , always hated that , I wanted to get them repainted but I am going to dip the car eventually
My doors don't match at certain angles...... Seems to only affect the light colors....
Ghost_Ls8
Dedicated LVC Member
I asked a local body shop and they said they put more yellow flakes in the pearl in that section of the car , I wanted the front bumper repainted but he said for the whole car to match he would have to re do the whole car
NickT88LSC
Dedicated LVC Member
waggs
Dedicated LVC Member
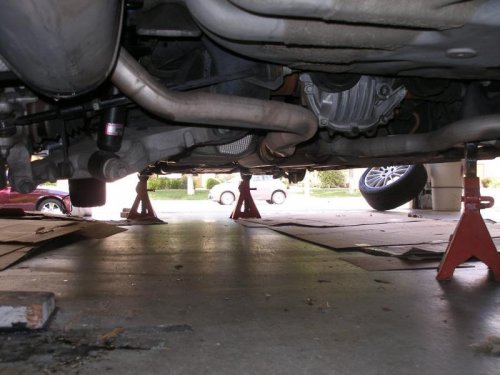
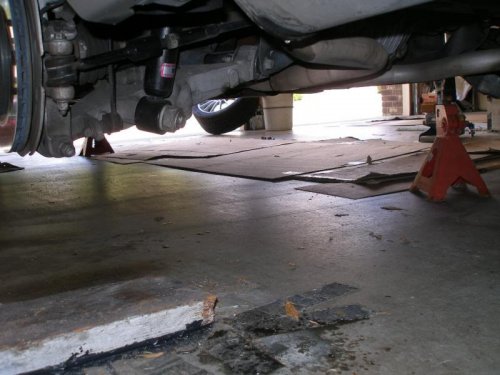
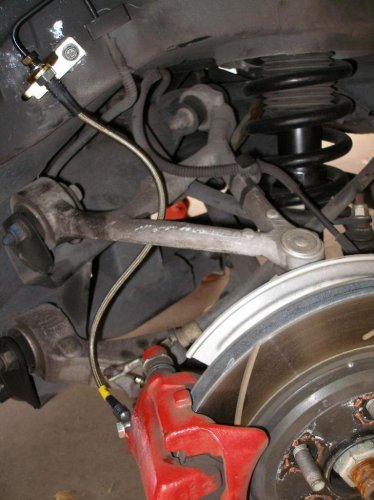
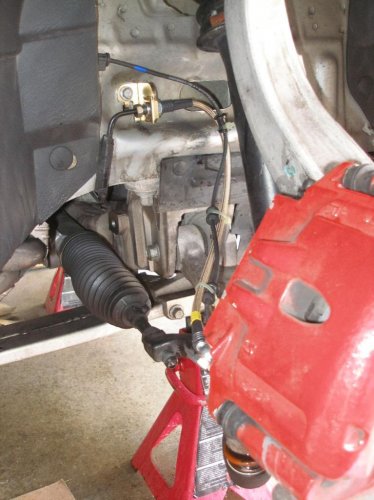
Installed the SS brake lines. Also, the LS has one stiff chassis!!!!!!
View attachment 828467517
I bet you say that because you can use one jack position to pick up both tires on one side. That is cool but dangerous too. It is very disconcerting when trying to jack up the opposite side and it starts to shift. I have to do it half way on each side to keep the stands from tipping.
RigsLS
Dedicated LVC Member
- Joined
- Mar 10, 2012
- Messages
- 7,756
- Reaction score
- 532
Here are the pics so it did happen :N
LOL, thanks!
Installed the SS brake lines. Also, the LS has one stiff chassis!!!!!!
View attachment 828467517
I bet you say that because you can use one jack position to pick up both tires on one side. That is cool but dangerous too. It is very disconcerting when trying to jack up the opposite side and it starts to shift. I have to do it half way on each side to keep the stands from tipping.
Actually, I jacked up the front and installed the front two stands. I then went to the right rear jacking point and jacked it up enough to install the right rear stand (which incidentally raised the right front off that jack stand). When I lowered the rear onto the stand, the right front lowered back onto it's stand, raising the left rear off the ground!!
Actually, I jacked up the front and installed the front two stands. I then went to the right rear jacking point and jacked it up enough to install the right rear stand (which incidentally raised the right front off that jack stand). When I lowered the rear onto the stand, the right front lowered back onto it's stand, raising the left rear off the ground!!
Yeah, that's the kind of thing I was talking about. When I did my oil, I jacked the left front first. That lifted the left rear enough to cause a problem. When I lifted the right, it started rocking back and forth like it as on 2 points. That's when I saw the left jack stand leaning over. I think I'll get a bigger jack and lift from the center from now on.
Yeah, that's the kind of thing I was talking about. When I did my oil, I jacked the left front first. That lifted the left rear enough to cause a problem. When I lifted the right, it started rocking back and forth like it as on 2 points. That's when I saw the left jack stand leaning over. I think I'll get a bigger jack and lift from the center from now on.
For my front jacking point I used (and have for almost 14 years) the front lower control arm mount, right in front of the crash braces. For the rear I used to use one of the sub-frame mounts, but now that I have an adapter I use the factory jacking point.
MaddShadez
Active LVC Member
Installed the SS brake lines. Also, the LS has one stiff chassis!!!!!!
View attachment 828467519
View attachment 828467520
Are those the ones from rockauto? any issues with installation? Any additional parts needed? Mine will be here tomorrow for a weekend install. Never messed with lines before, want to make sure i have all i need before i start.
Are those the ones from rockauto? any issues with installation? Any additional parts needed? Mine will be here tomorrow for a weekend install. Never messed with lines before, want to make sure i have all i need before i start.
Yes, they are.
I needed, as well as I can remember, a 13mm (open end) wrench, a 5/8" hydraulic line wrench, 10mm socket, 11mm (closed end) wrench, new brake fluid and a couple of miscellaneous tools I don't remember. Installation was pretty straight forward.
Start with the corner furthest away from the reservoir and work towards the reservoir. Have a bucket and rags handy to catch/clean leaking brake fluid; and remember it is VERY corrosive!! It WILL eat your paint!! I would remove the bottom of the connection first and the top second. I also found it easier to attach the new hose to the caliper first, otherwise you'll be trying to install that connection with brake fluid dripping all over the place!!
When changing the top connection, loosen the fitting before removing the bracket. This applies to the front and rear. I found it easier to mount the line into the bracket with the "C" clip before I installed the bracket. That clip is pretty tough to get in there!!
I found bleeding to be MUCH easier with the engine running and a partner. My wife, who I definitely did NOT marry for her mechanical skills, did a great job of helping me. I don't remember the wrench size for the bleeder screw. The way the front dust cap is installed I found it easier to put the closed end of the wrench on the nut then put the bleeder hose on. Again, start bleeding from the furthest caliper and work back.
Anything I forgot??
Telco
Dedicated LVC Member
Yeah, that's the kind of thing I was talking about. When I did my oil, I jacked the left front first. That lifted the left rear enough to cause a problem. When I lifted the right, it started rocking back and forth like it as on 2 points. That's when I saw the left jack stand leaning over. I think I'll get a bigger jack and lift from the center from now on.
How about a set of ramps instead? Faster and easier for oil changes.
On using jack stands, I usually jack vehicles up in stages to avoid this problem. It takes a little longer, but it's a lot safer. When I reach the height I want, I also go back to the opposite side, take the load off the jack stand and reset it just to avoid the possibility that one of the jack stands might not be set squarely under the car.
How about a set of ramps instead? Faster and easier for oil changes.
Every time I tried using ramps all I managed to do is push the ramps forward......
MaddShadez
Active LVC Member
Lol i had the same problem with ramps. I ended up buying some 2x4 to brace the ramp against the back wall of my garage. Works like a charm.
Deaconblue
Well-Known LVC Member
Due to the smooth, treated surface inside the garage, I can't use the ramps in there. I tried to brace them against the back wall footer with 2x10" but that didn't work either due to the design of my ramps.
http://www.autoramps.com/ultra_ramps.htm
The driveway surface is rough enough to use the ramps without any issues. I also have a set of extension for the ramps so that I can get the cars up easier and not worry about lower bumper cover. Works well on the other cars in the fleet as well.
http://www.autoramps.com/ultra_ramps.htm
The driveway surface is rough enough to use the ramps without any issues. I also have a set of extension for the ramps so that I can get the cars up easier and not worry about lower bumper cover. Works well on the other cars in the fleet as well.
joegr
Dedicated LVC Member
Due to the smooth, treated surface inside the garage, I can't use the ramps in there. ... The driveway surface is rough enough to use the ramps without any issues. ...
Same results here. Also, my driveway has some slope to it and crests just before the garage. I set the ramps there. That way, the front of the car is already pointed a little into the air. That gives a little extra clearance to get onto the ramps.
How about a set of ramps instead? Faster and easier for oil changes.
On using jack stands, I usually jack vehicles up in stages to avoid this problem. It takes a little longer, but it's a lot safer. When I reach the height I want, I also go back to the opposite side, take the load off the jack stand and reset it just to avoid the possibility that one of the jack stands might not be set squarely under the car.
I am afraid of ramps. I'd have to get some super sturdy ones for sure. I am not sure if I can clear the chin on approach so they would have to be long.
I am now using the staged jacking procedure. That is something I learned from experience. I was afraid to tell anyone about that part.
joegr
Dedicated LVC Member
I am afraid of ramps. ...
I've been using ramps for over 30 years, with no problems so far. I started with heavy metal ramps, but I have plastic ones now (for the last four or five years).


